Diagnosis and treatment plans
Practice Harbor lets you add diagnoses to a client's chart using standard ICD-10 codes and create treatment plans — either manually or with AI assistance. There is no limit to how many diagnosis and treatment plan entries you can create for a client.
In this guide, we'll cover:
- Adding a diagnosis
- View mode
- Creating a treatment plan
- Load previous plan
- ICD-10 diagnosis codes
- Client signatures
- Tips
Adding a diagnosis
- Navigate to the client's chart
- Click New and select Diagnosis and treatment plan
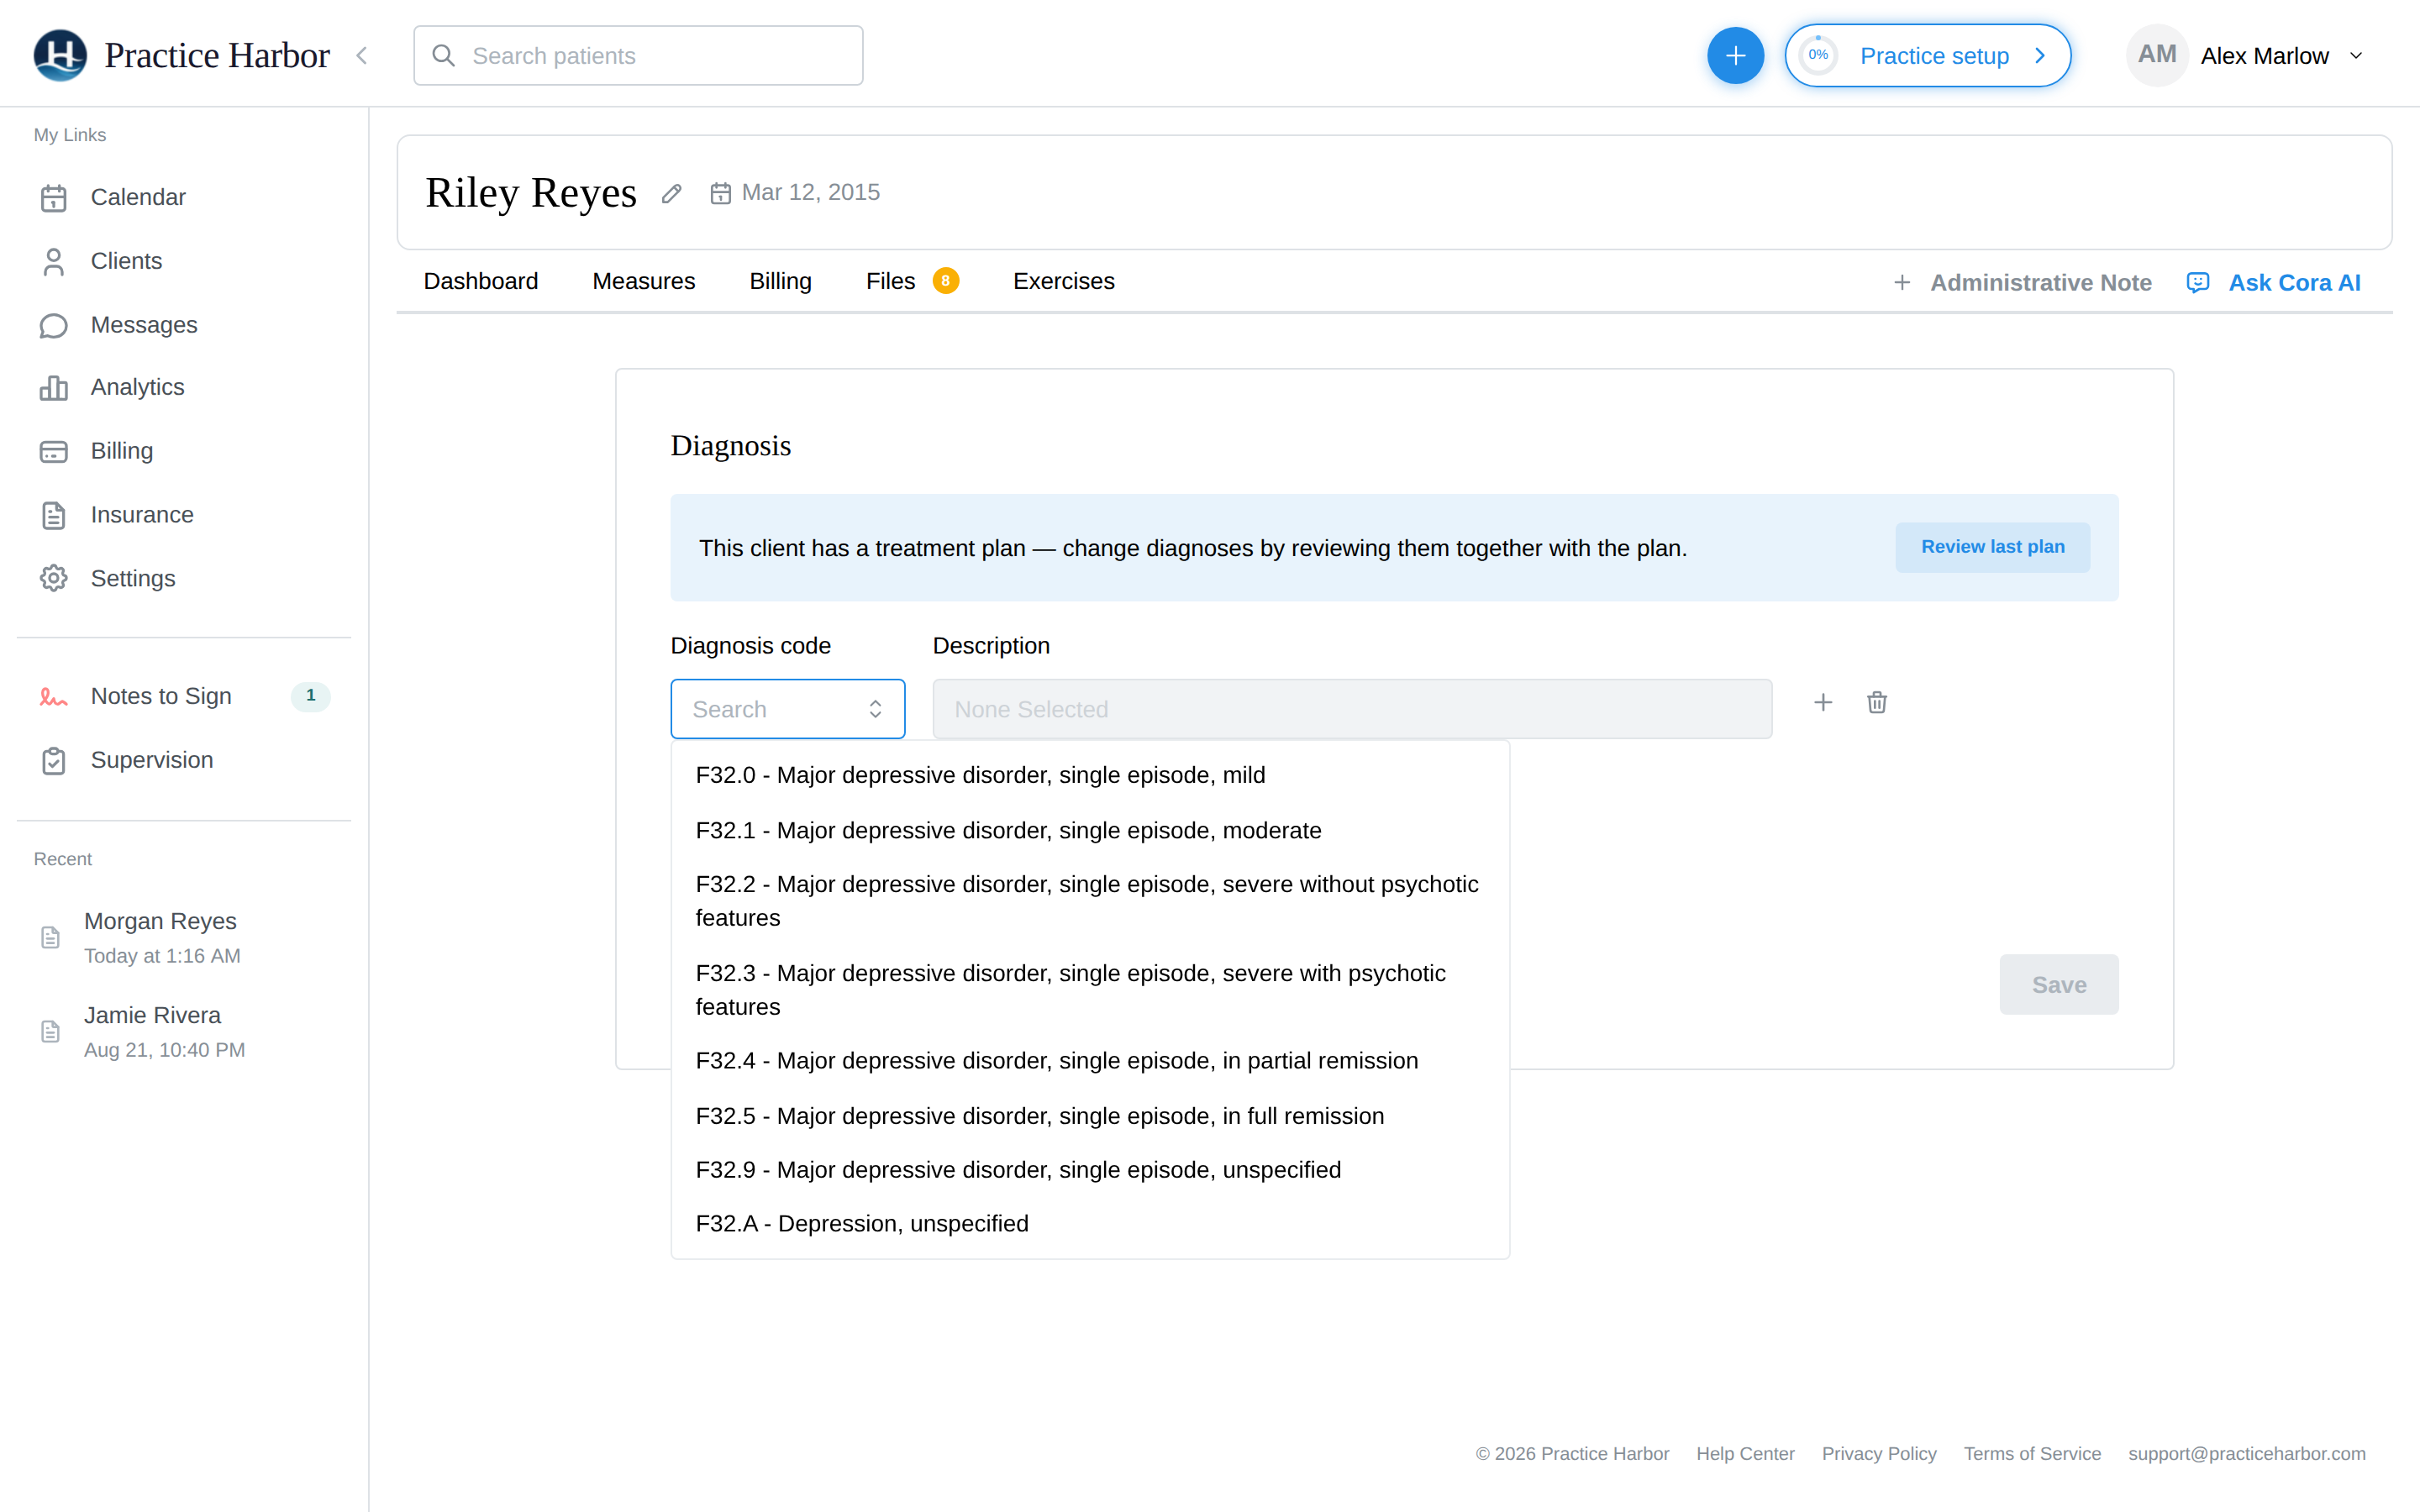
- In the Diagnosis code dropdown, search for an ICD-10 code by typing the code (e.g., "F32.1") or a keyword (e.g., "depression")
- The dropdown displays the full code and description (e.g., "F32.1 - Major depressive disorder, single episode, moderate")
- Once you select a code, the Description field auto-populates with the diagnosis name — you can edit this text if needed
- Set the Date and time of diagnosis (defaults to the current date and time)
- Click Save (the button reads Update when you're editing an existing entry)
Adding multiple diagnoses
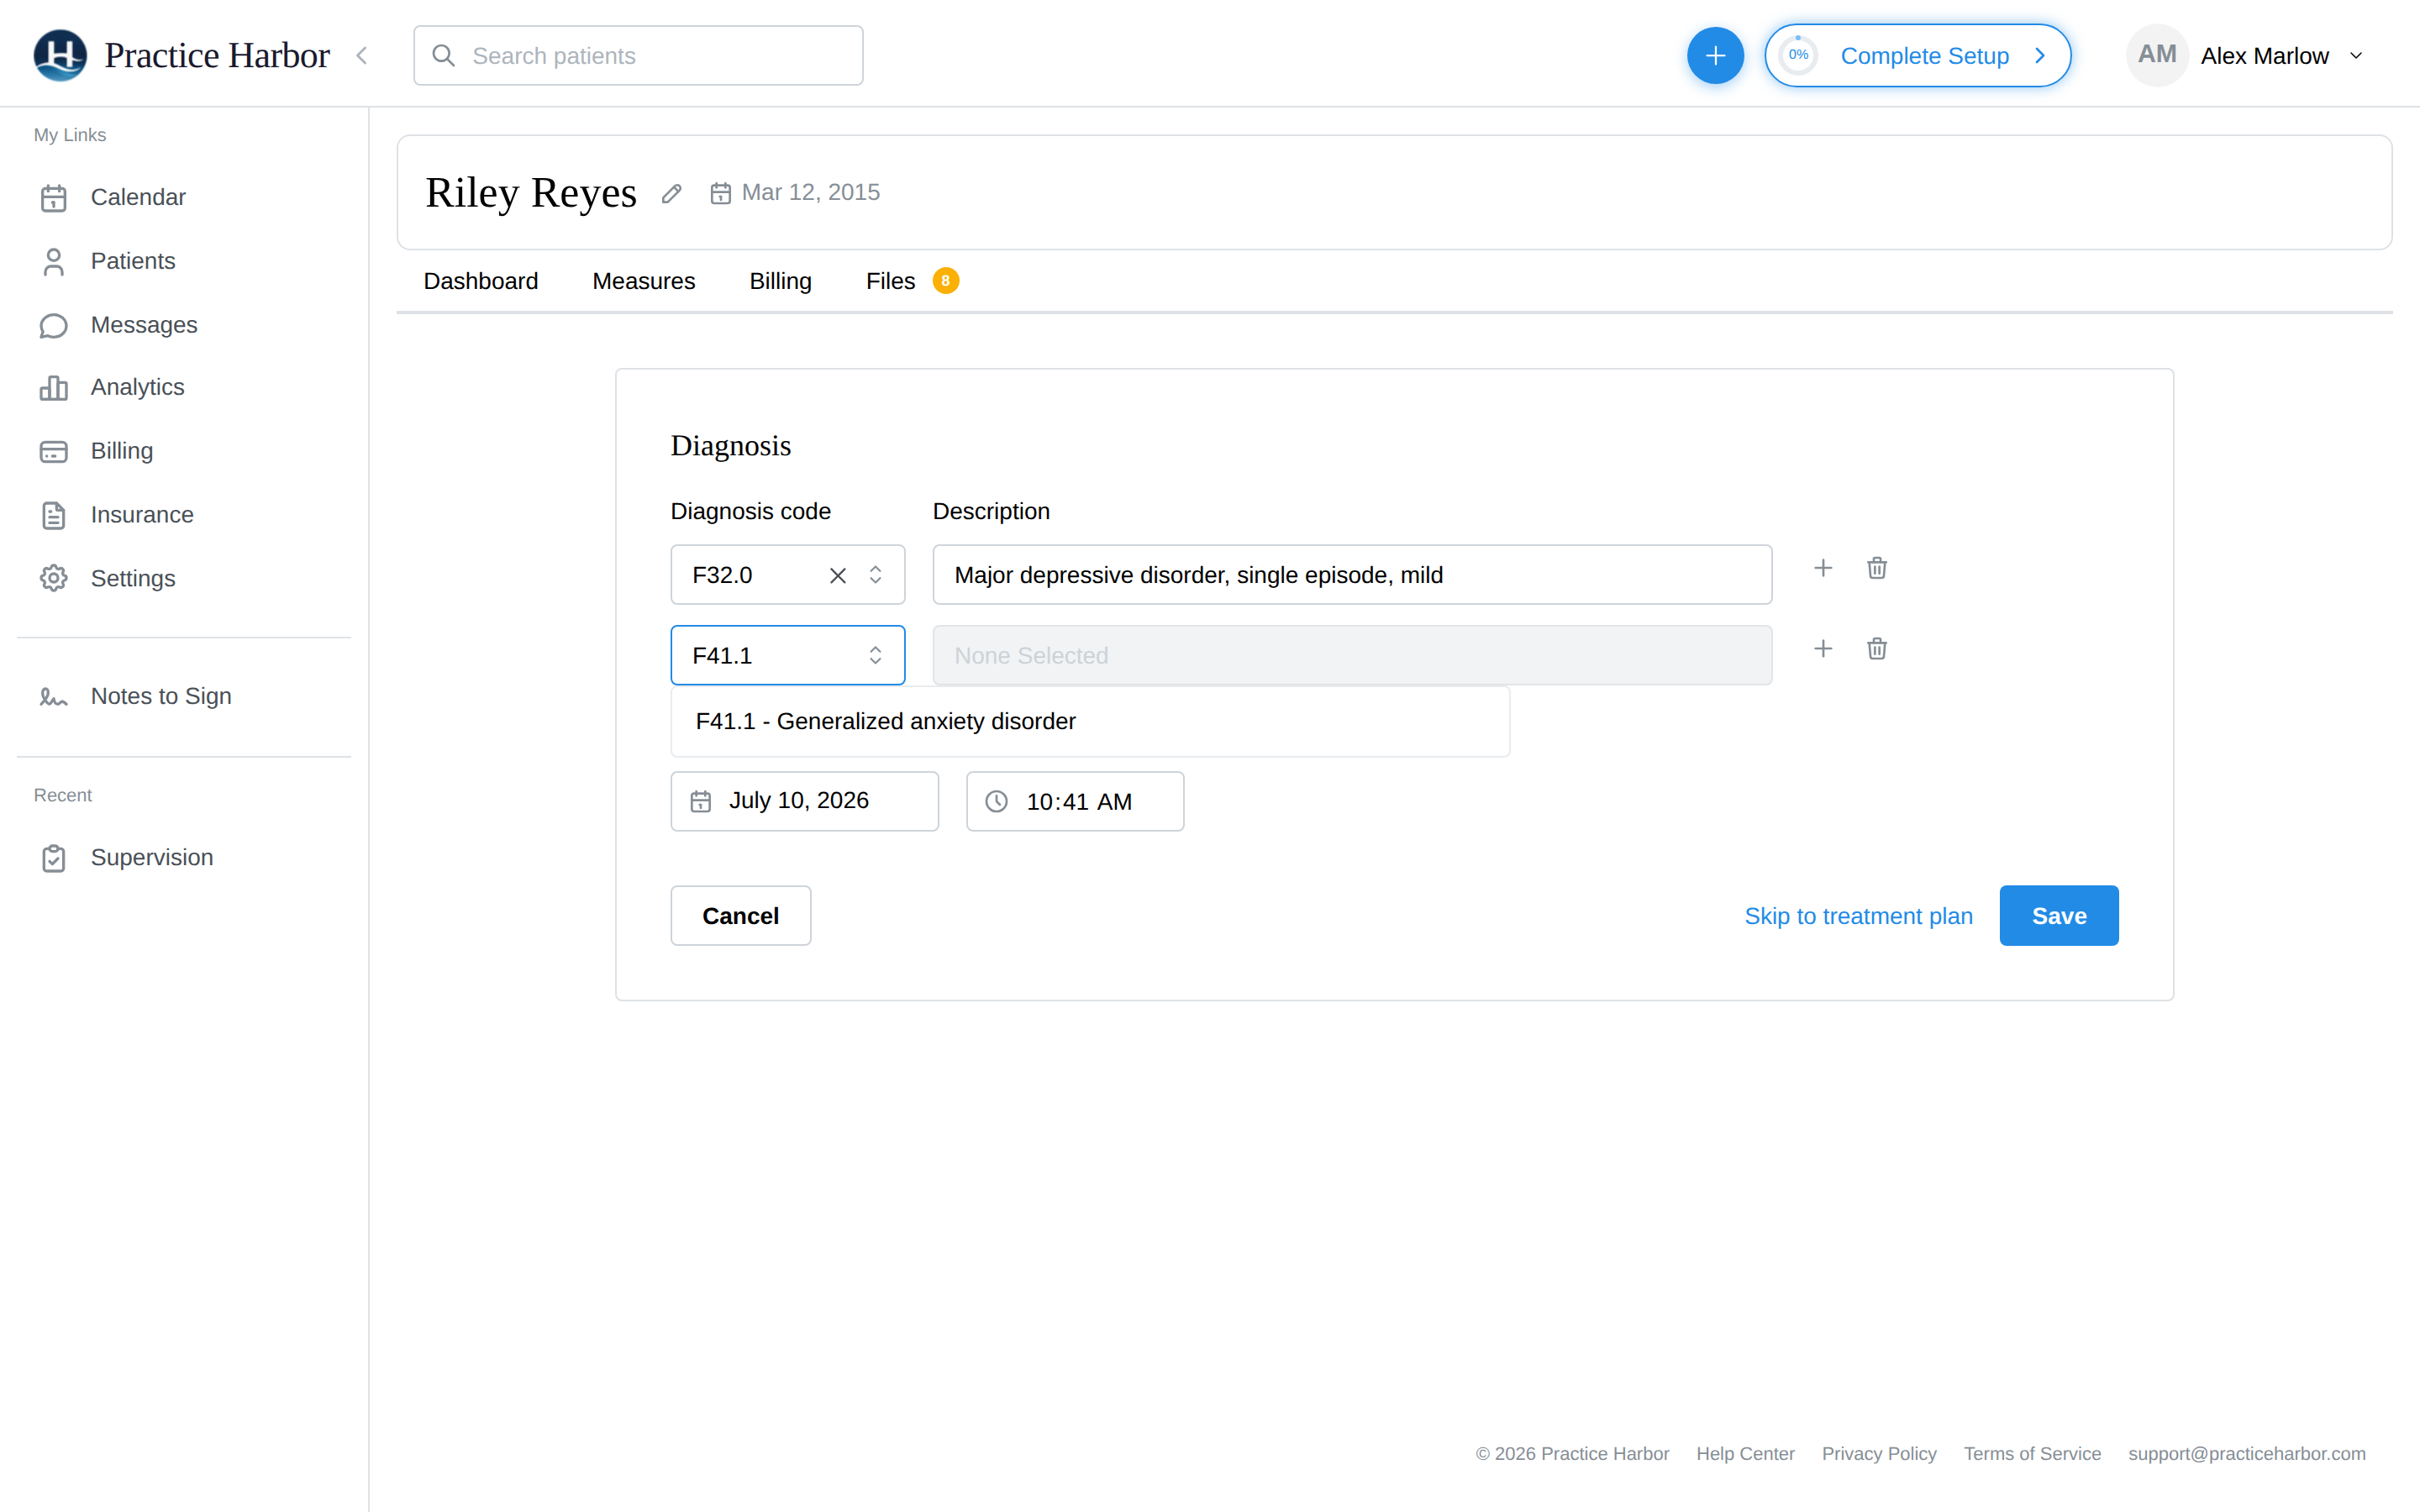
You can add multiple diagnoses to a single entry:
- Click the + (plus) button next to any diagnosis row to add another row
- Select a code and adjust the description for each row
- To remove a row, click the trash icon next to it (if only one row remains, the trash icon resets it instead of removing it)
- Click Save to store all diagnoses at once
All diagnoses in an entry share the same date and time.
Skipping the diagnosis
If you want to go directly to a treatment plan without entering a diagnosis, click the Skip to treatment plan link at the bottom of the diagnosis form.
View mode
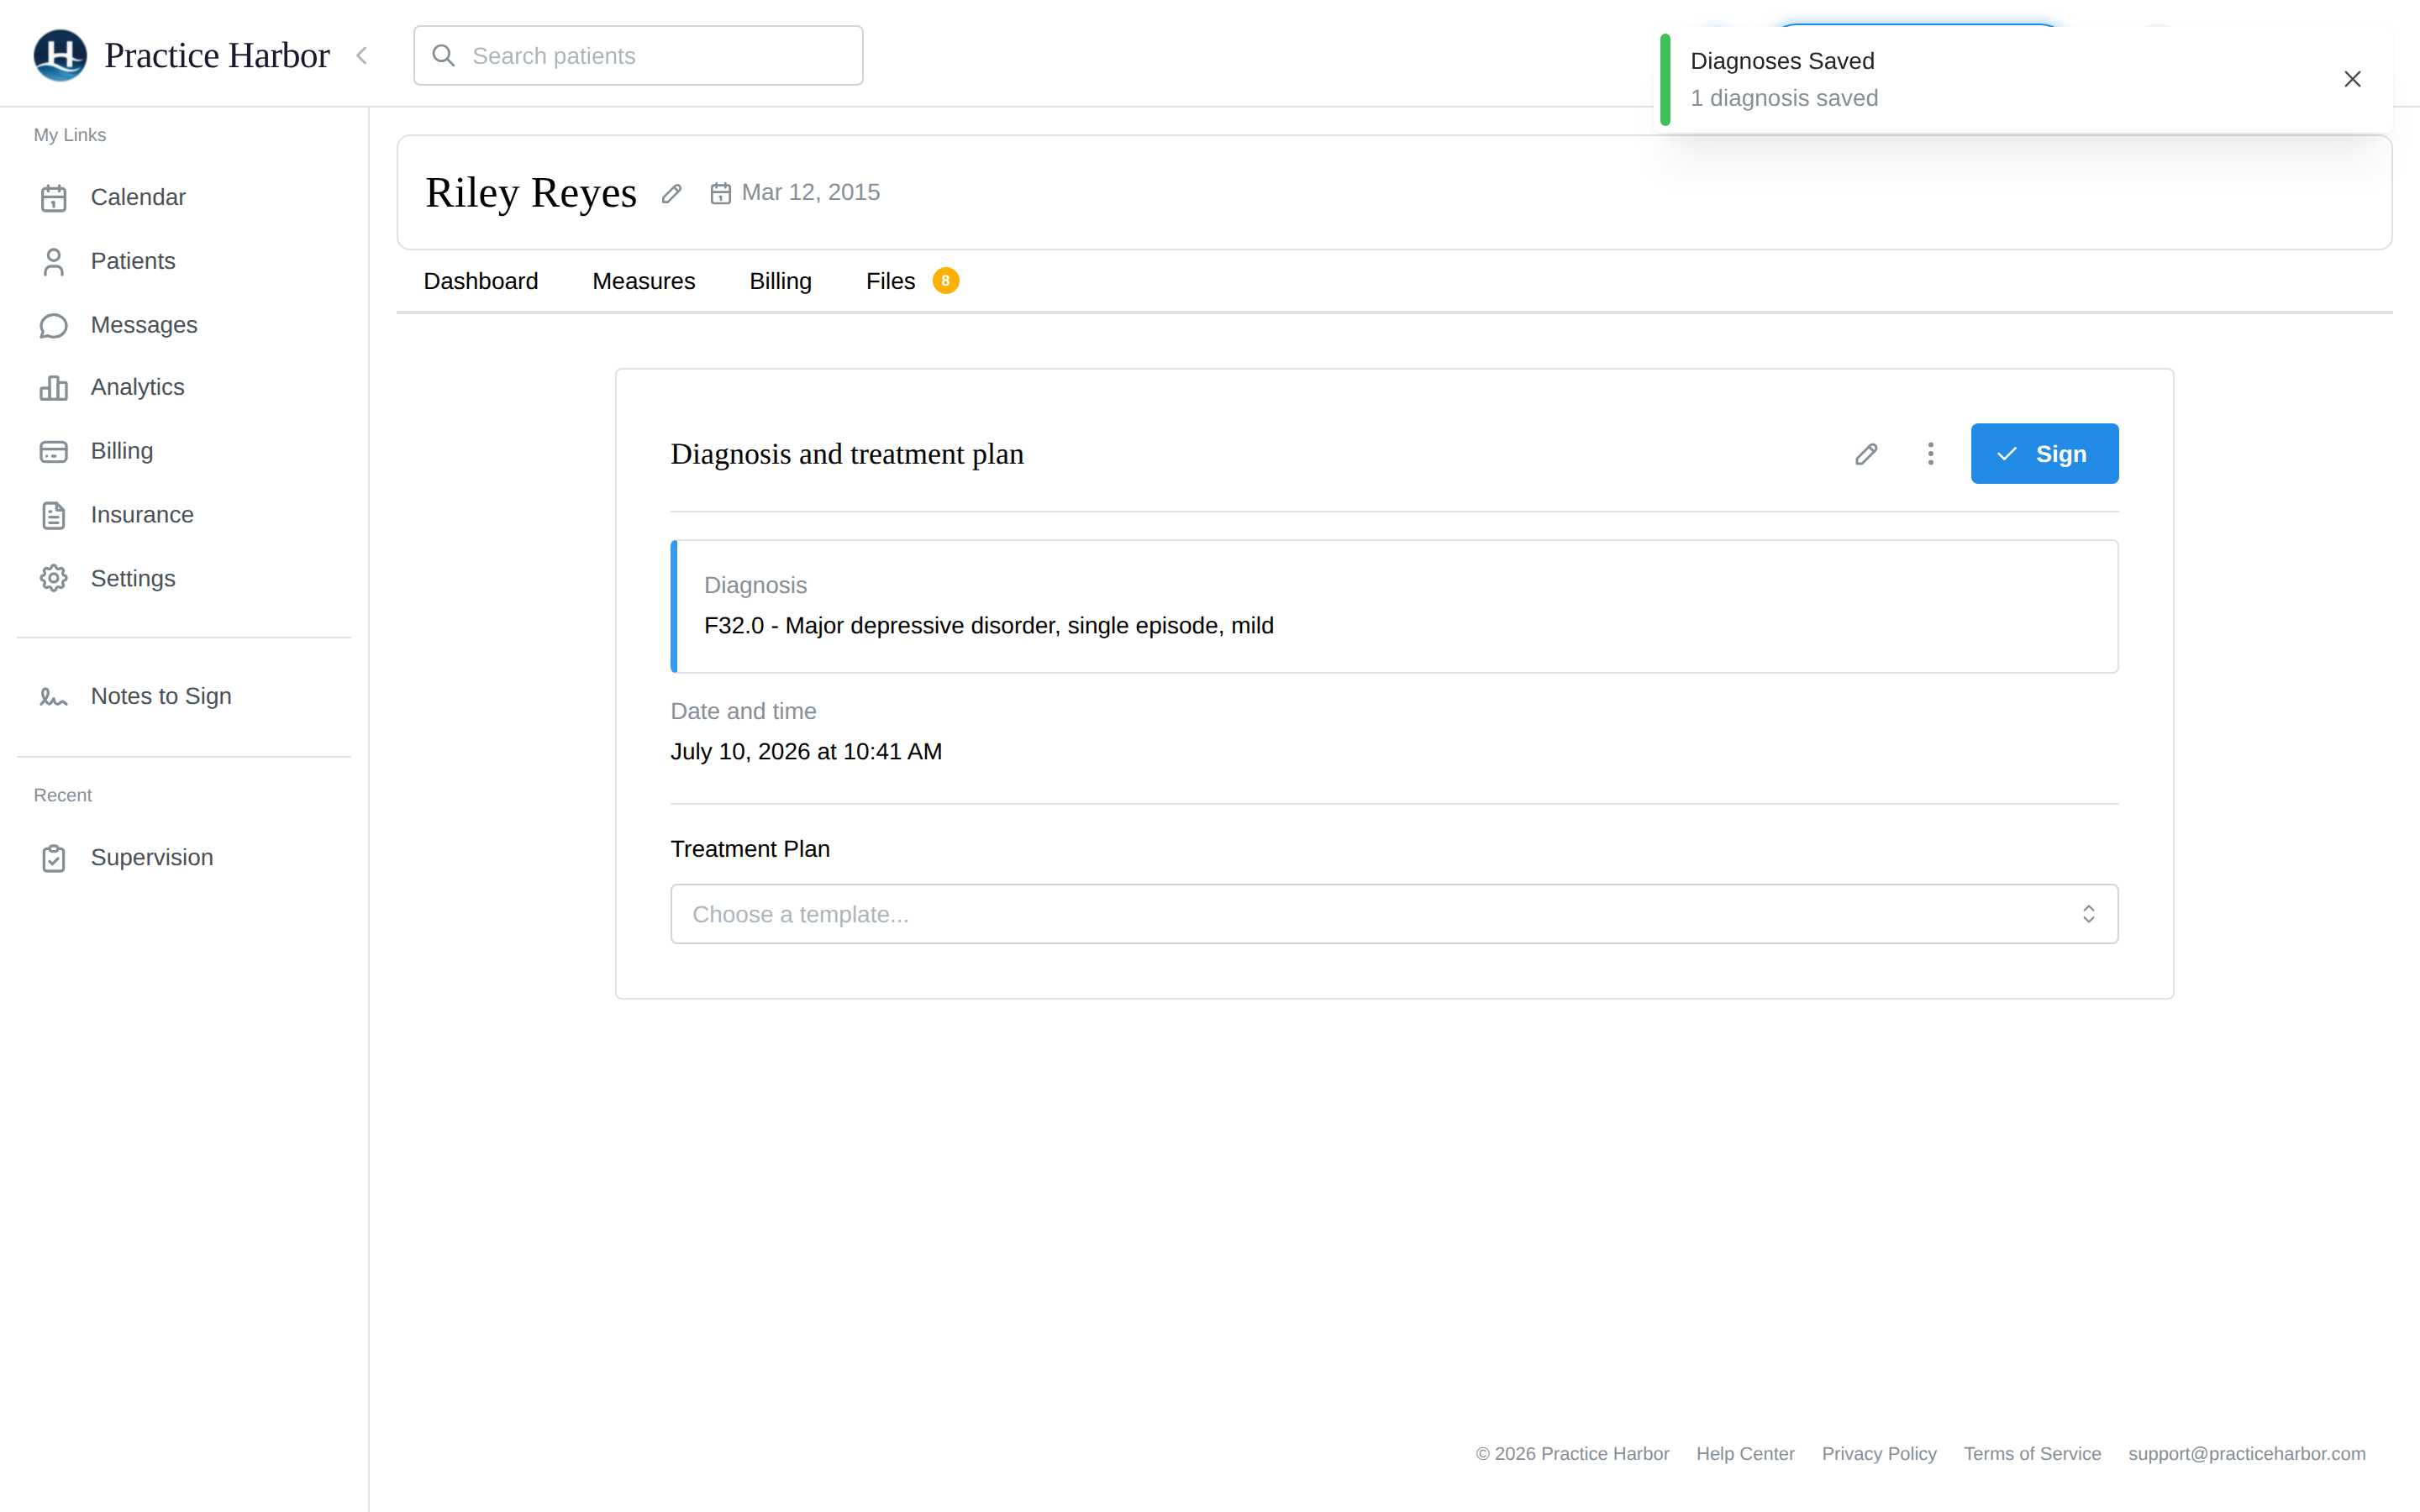
After saving your diagnoses, the page switches to a read-only view. From here you can:
- Sign — Click the Sign button to attest the diagnoses (your name and the signing time are recorded on the entry) and return to the client's chart.
- Edit — Click the pencil icon to return to edit mode with your saved diagnoses pre-populated.
- Print — Open the More menu (three-dot icon) and select Print to print the diagnosis summary.
- Download — Open the More menu and select Download to save a text file summary of the diagnoses.
- Delete — Open the More menu and select Delete to remove all diagnoses in this entry and return to edit mode.
Creating a treatment plan
After saving diagnoses, a Treatment Plan template picker appears in view mode. You have two options:
Simple template
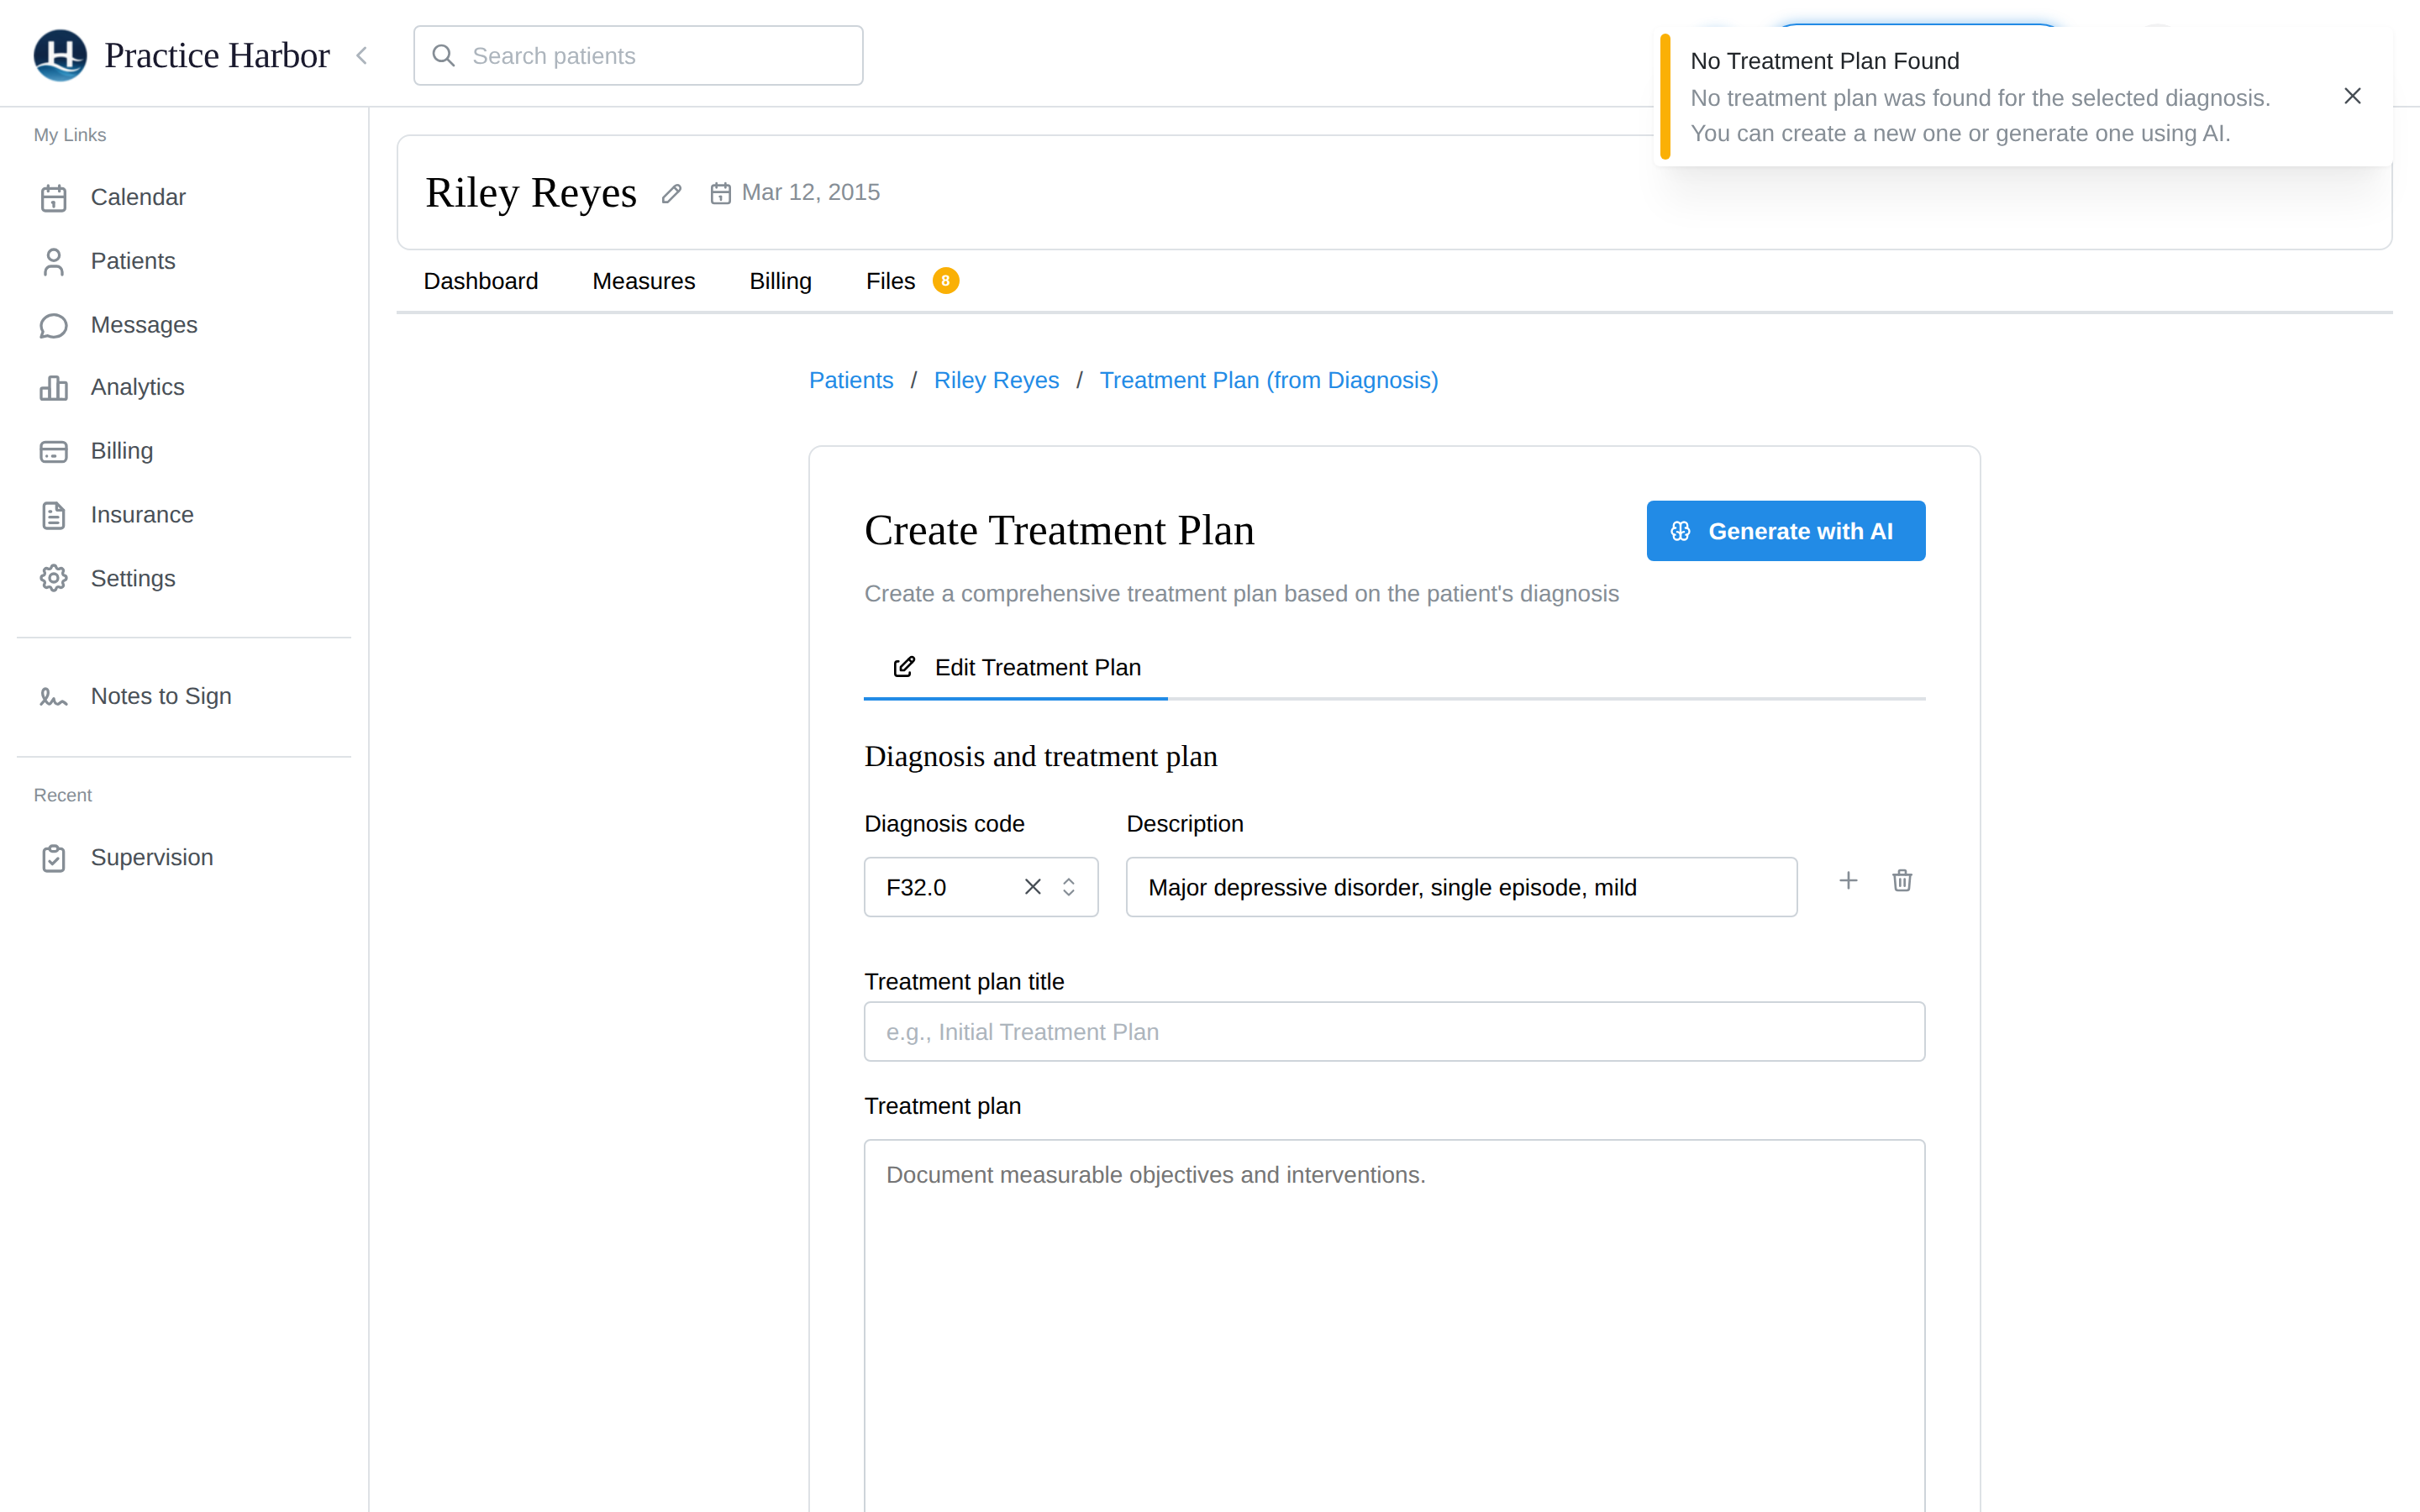
Select Simple from the template picker to open a straightforward text-based treatment plan form.
- Your saved diagnoses carry over automatically with their ICD-10 codes and descriptions
- Optionally enter a Treatment plan title (e.g., "Initial Treatment Plan")
- Write your treatment plan in the Treatment plan text area — document measurable objectives and interventions
- Click Save Treatment Plan
The Simple template is ideal for quick, free-form documentation.
Advanced template with AI
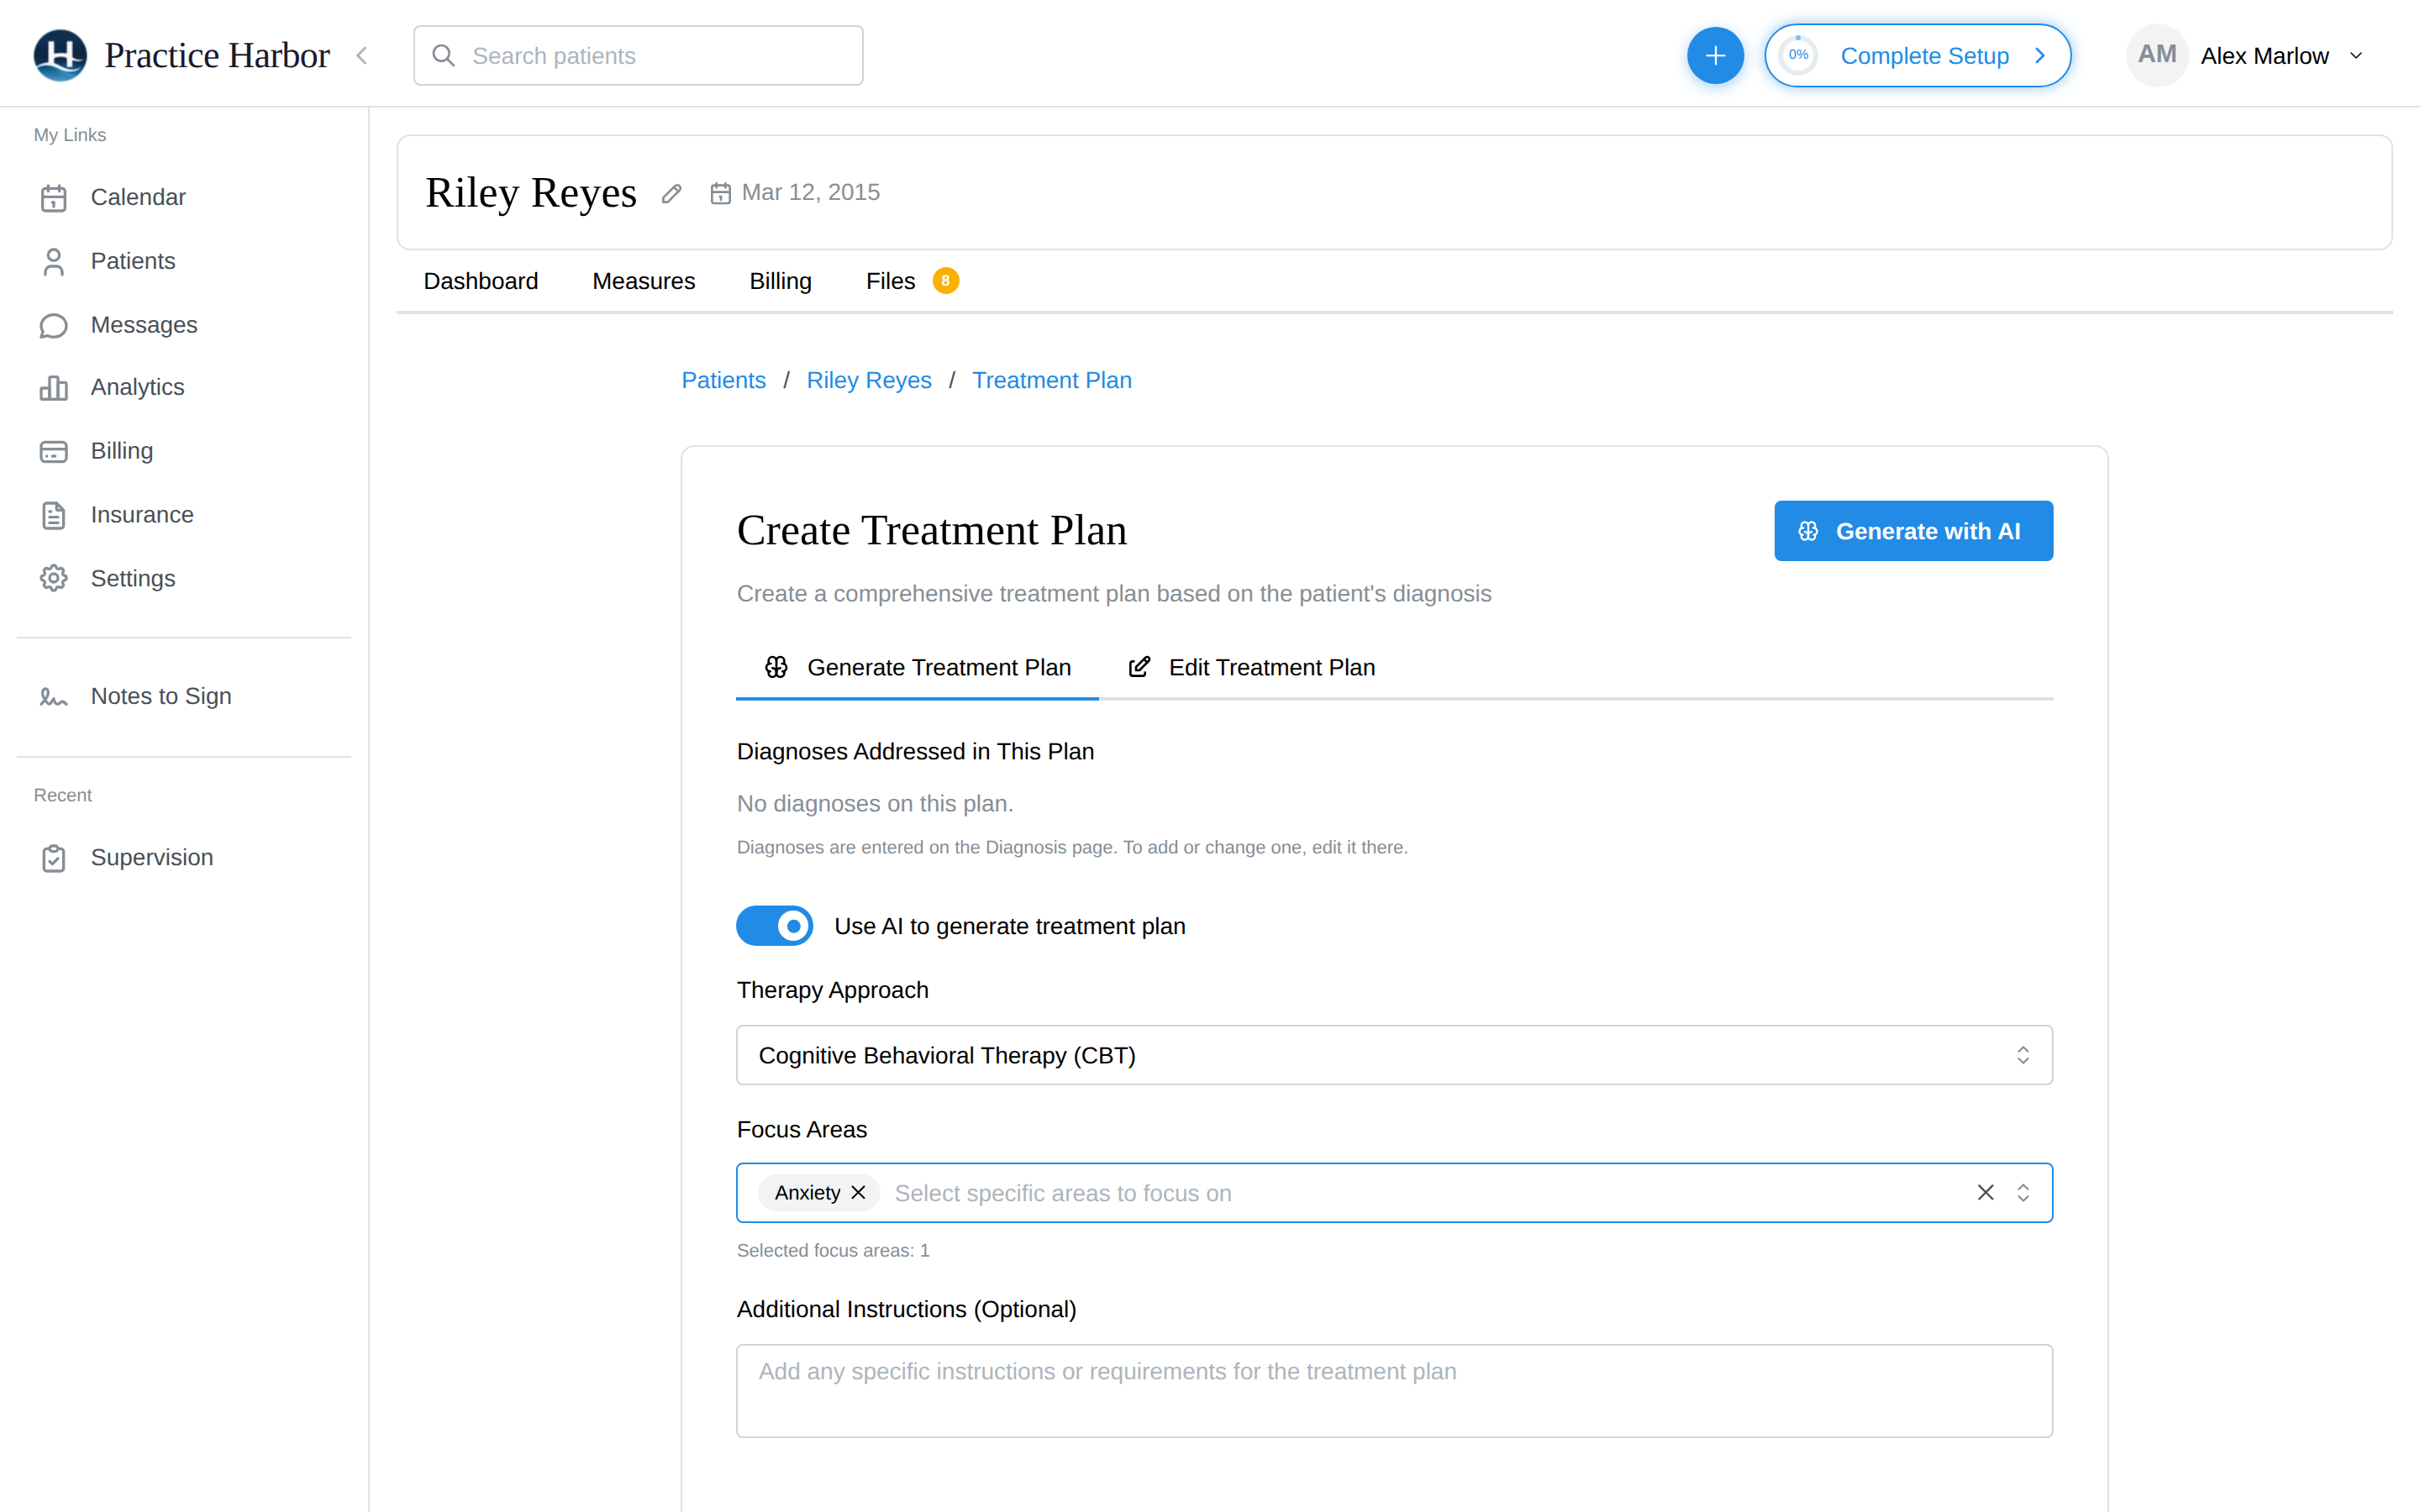
Select Advanced with AI from the template picker (or navigate to the treatment plan page directly) to access the full-featured treatment plan editor. The Advanced template has two tabs:
Generate Treatment Plan Tab
This tab lets AI create a structured treatment plan based on your inputs:
- The plan's diagnoses come from the Diagnosis page — "Diagnoses are entered on the Diagnosis page. To add or change one, edit it there." (Arriving from the diagnosis view carries them automatically.)
- Leave Use AI to generate treatment plan on, and choose a Therapy Approach (CBT, DBT, ACT, Psychodynamic, Solution-Focused, or General)
- Select Focus Areas relevant to the client (Depression, Anxiety, Trauma, Relationships, Coping Skills, and more)
- Optionally add Additional Instructions for the AI
- Click Generate with AI
- The AI creates a structured plan with goals, activities, and assessments, ready for review on the Edit Plan Details tab
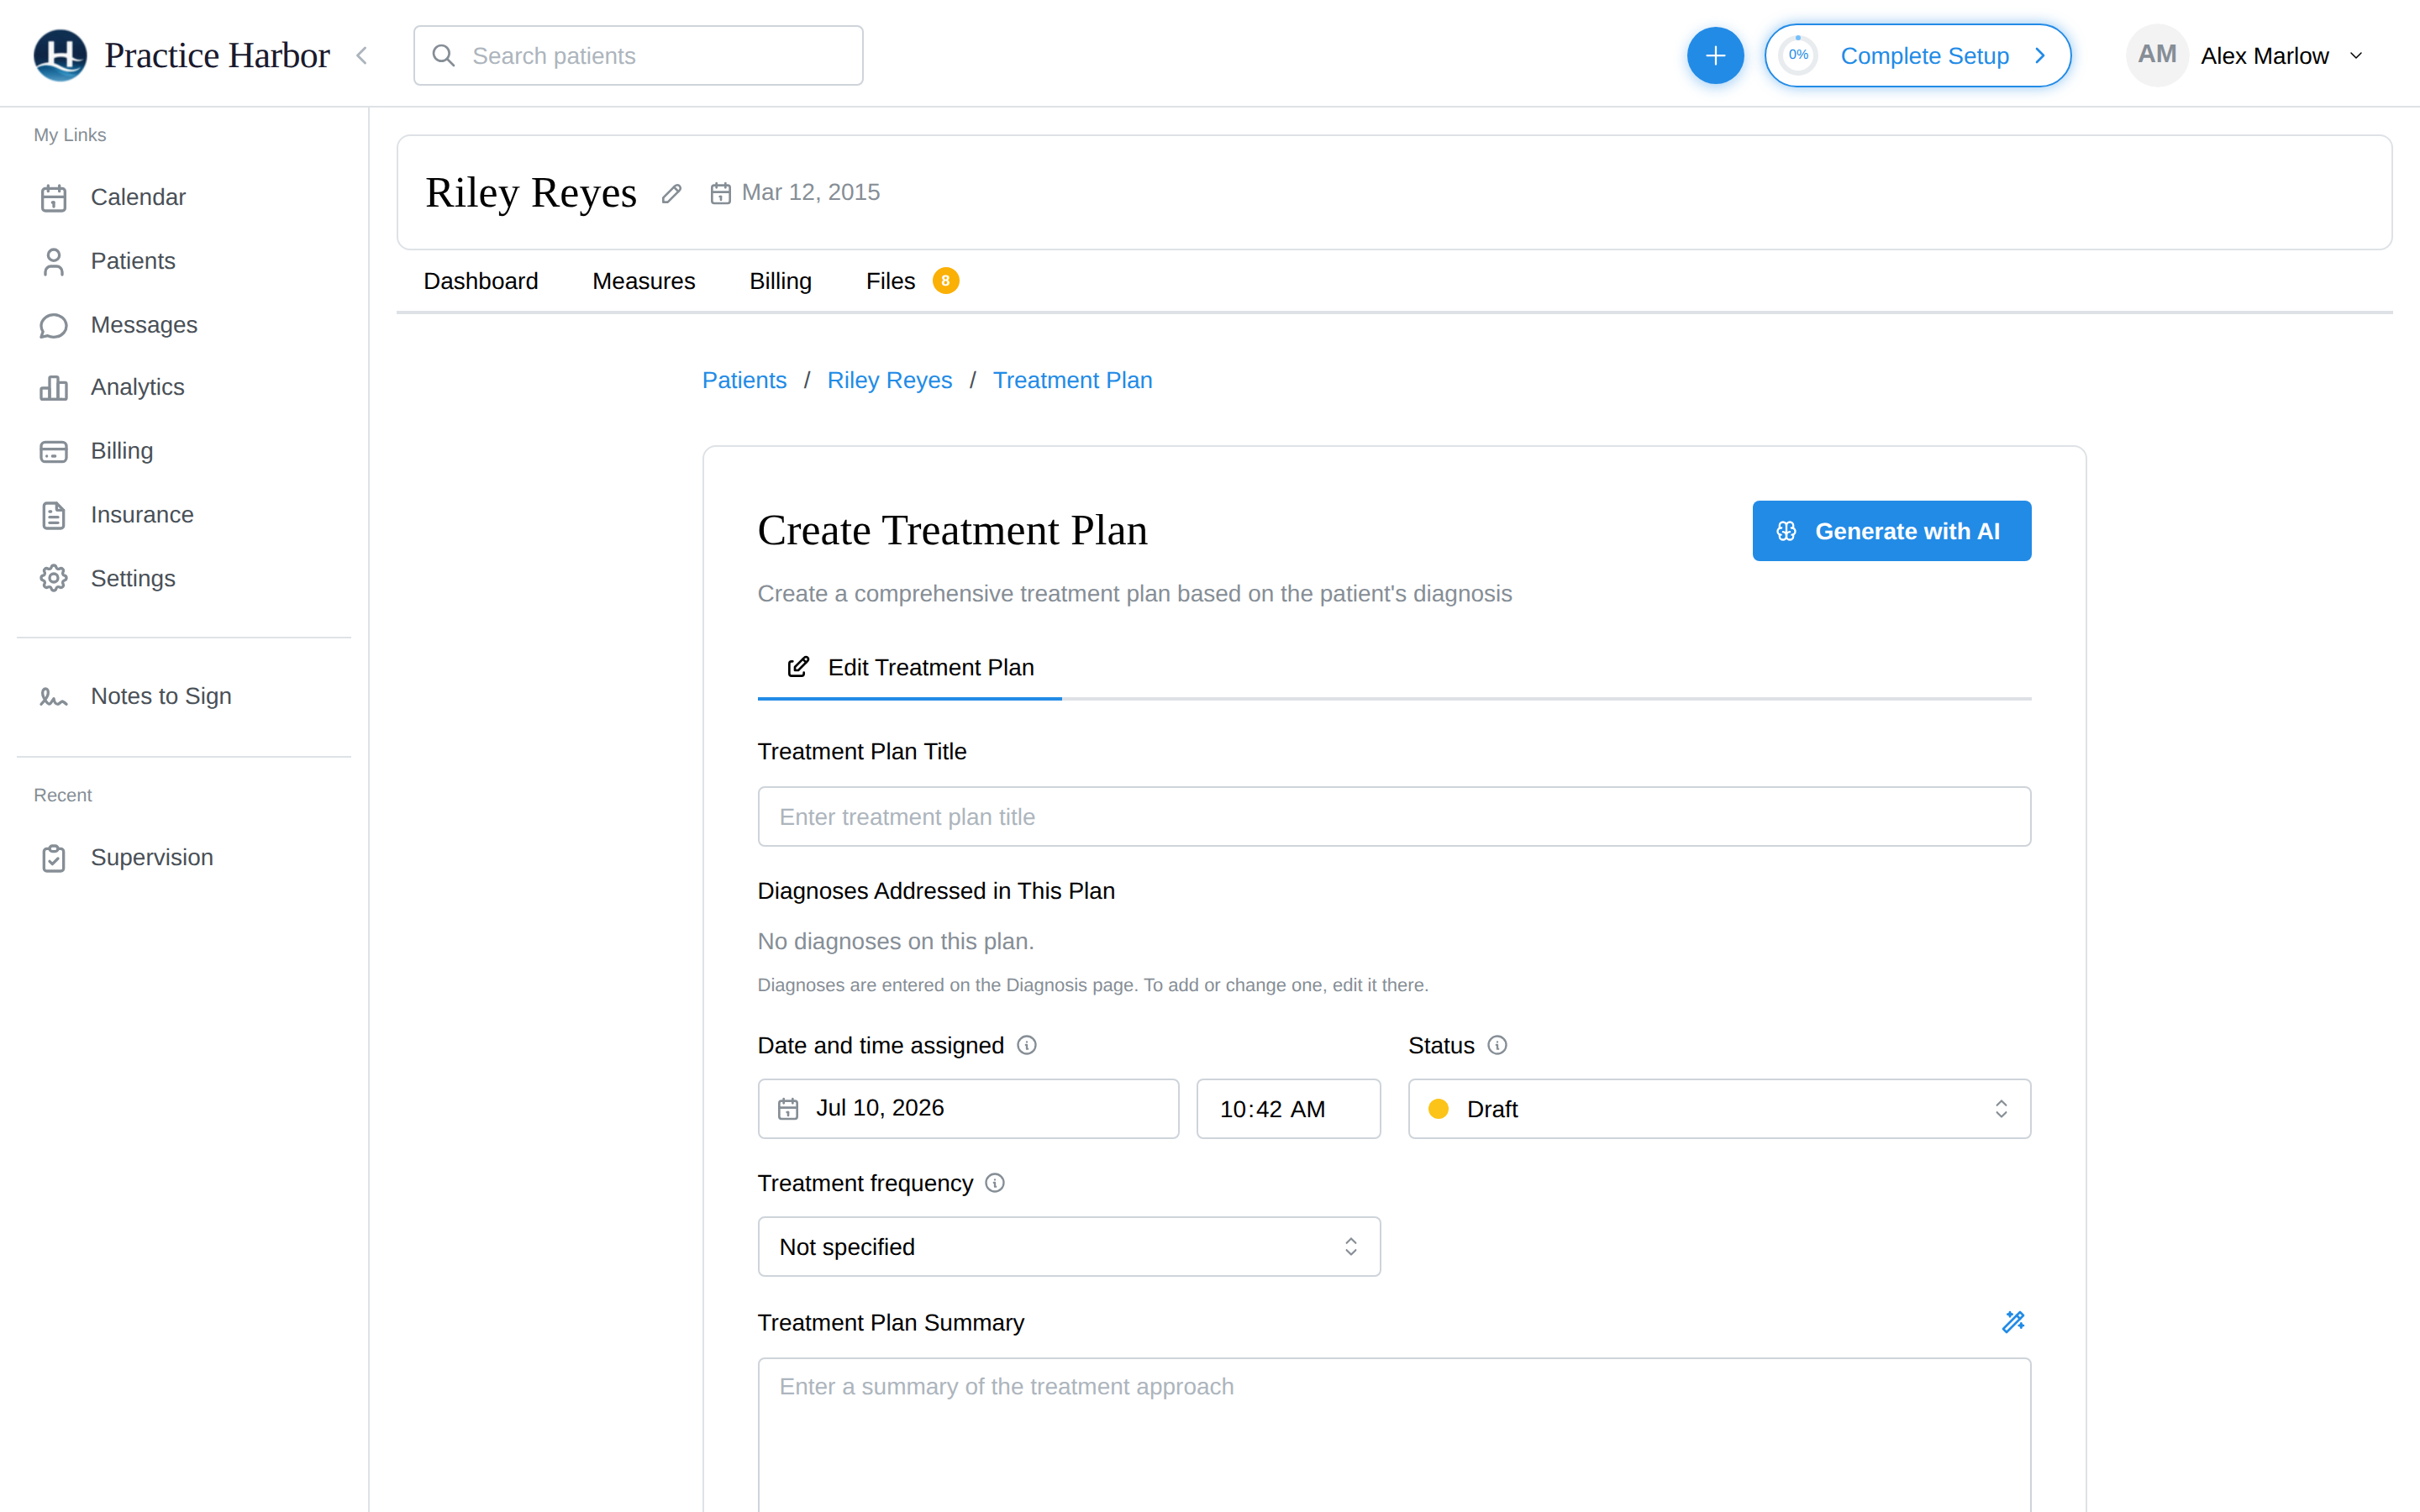
Edit Treatment Plan Tab
This tab displays the structured treatment plan with editable sections:
- Goals — What the client is working toward, each with a lifecycle status (Proposed, Planned, Active, Completed, etc.)
- Activities/Interventions — Therapeutic approaches and specific interventions, each with a status (Not Started, In Progress, Completed, etc.)
- Assessments — Clinical measures and evaluations to track progress
- Plan title and notes — Overall plan metadata
You can manually add, edit, or remove goals, activities, and assessments. Each section has + buttons to add new items and trash icons to remove them.
Generate with AI button
When creating a new treatment plan (not editing an existing one), the Generate with AI button appears in the top-right corner of the page. Click it to have the AI generate a structured treatment plan based on the client's diagnoses and your selected options. The generated plan populates the Edit tab where you can review and modify it before saving.
For best results with AI generation, select specific diagnoses and focus areas rather than leaving them blank. The more context you provide, the more tailored the generated plan will be.
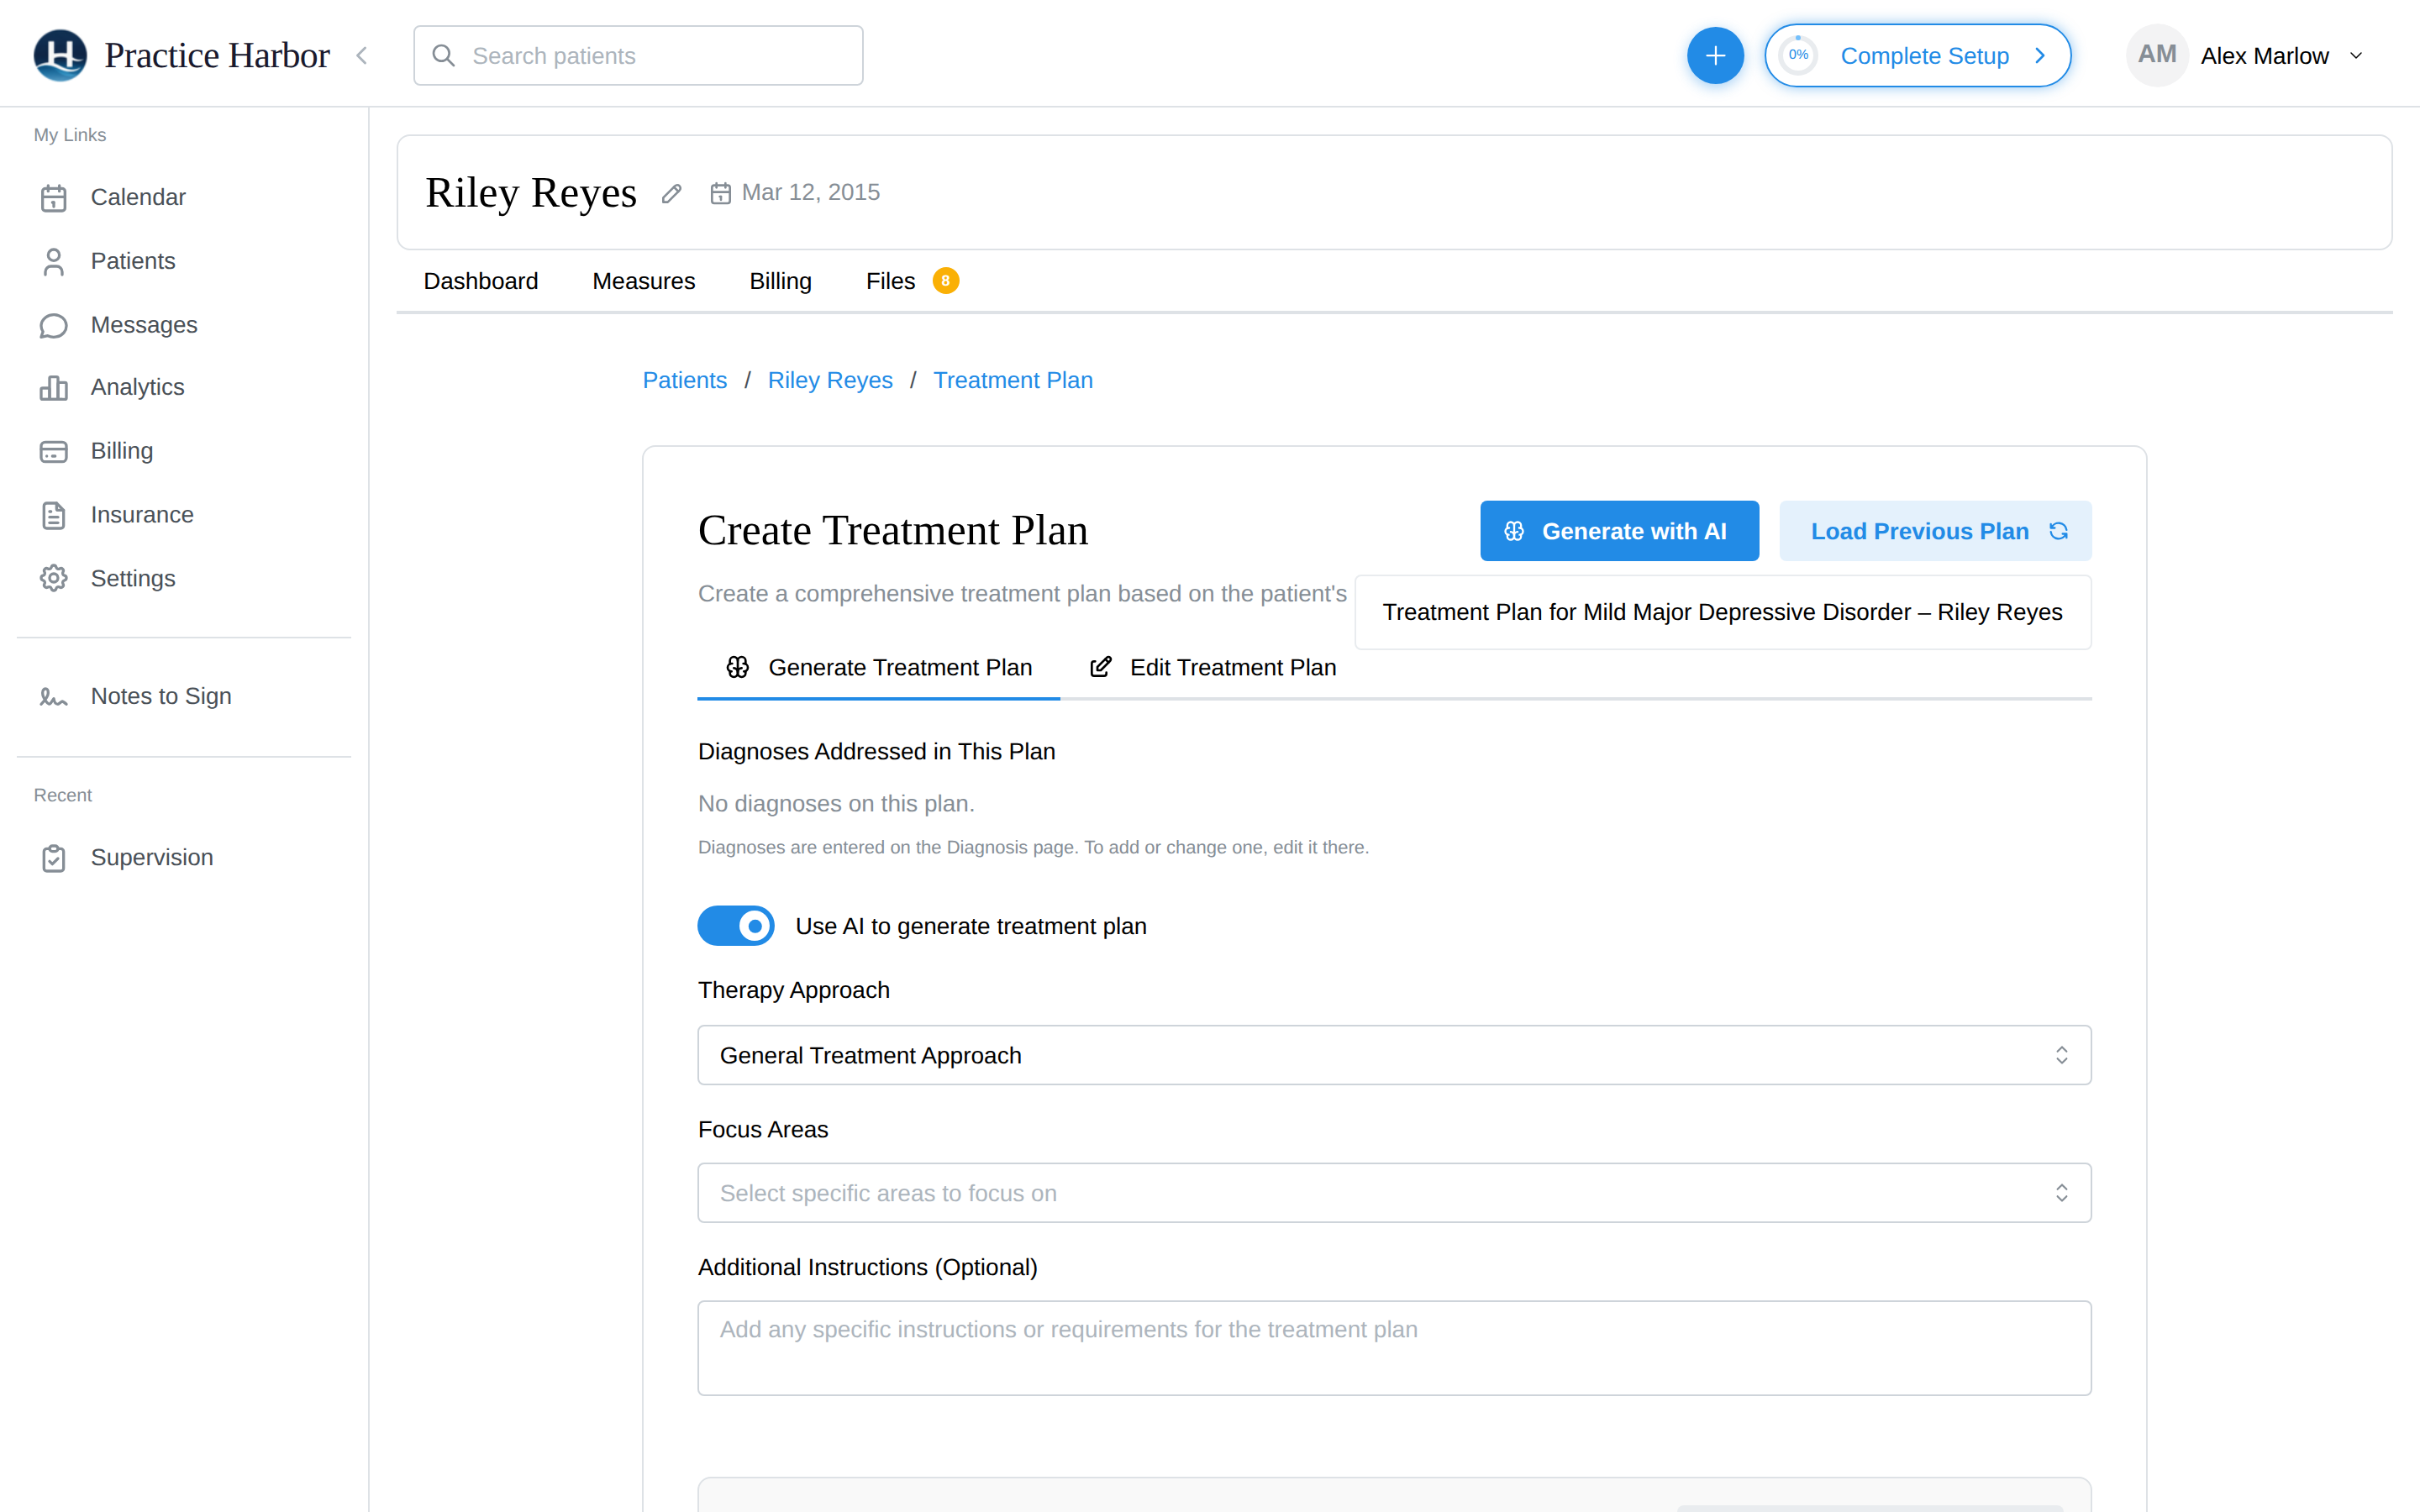
Load previous plan
If the client has existing treatment plans, a Load Previous Plan button appears next to the Generate with AI button. Click it to see a dropdown of up to 5 previous plans (active, draft, or completed). Selecting a plan loads it into the editor so you can review or update it.
This is useful when you want to build on a prior plan rather than starting from scratch.
ICD-10 diagnosis codes
Practice Harbor includes a curated library of ICD-10 mental health diagnosis codes (383 codes) organized by category:
| Category | Code Range | Examples |
|---|---|---|
| Depressive Disorders | F32-F34 | Major depressive disorder, Dysthymia, PMDD |
| Bipolar Disorders | F30-F31 | Bipolar I, Bipolar II, Cyclothymia |
| Anxiety Disorders | F40-F41 | Generalized anxiety, Social anxiety, Phobias |
| Trauma and Stress-Related | F43 | PTSD, Acute stress, Adjustment disorders |
| OCD and Related | F42 | OCD, Body dysmorphic disorder |
| Substance Use | F10-F19 | Alcohol, Opioid, Cannabis use disorders |
| Eating Disorders | F50 | Anorexia, Bulimia, Binge eating |
| Personality Disorders | F60 | Borderline, Narcissistic, Antisocial |
| Neurodevelopmental | F84, F90 | Autism spectrum, ADHD |
| Other | Various | Insomnia, Sexual dysfunction, Relationship problems |
The diagnosis code search supports searching by code number or description text.
ICD-10 codes are updated annually on October 1st. To confirm a code is current and billable, you can check the ICD-10 database.
Printing or downloading a plan
Any loaded plan has Print and Download PDF buttons — the PDF includes diagnoses, treatment frequency, goals, interventions, assessments, and every signature on the plan (including the client's e-signature and a supervisor's co-sign). Drafts print too; the PDF states the plan's status.
Keeping an eye on plan status practice-wide
Analytics has a Treatment plans ring on the dashboard (your active caseload's plan coverage at a glance) and a Treatment plans report — one row per client showing whether their current plan is signed, awaiting co-sign, awaiting the client's signature, unsigned, or missing, with review-due dates highlighted when overdue. Filter by status or export to CSV. See Analytics reports.
Client signatures
Once a treatment plan is fully signed (including your supervisor's co-signature, if you have one), you can invite the client to sign it electronically:
- Open the plan and click Request client signature (it appears next to Unlock once the plan is signed — also available on the plan's card in the client's chart).
- The Share Documents flow opens with the plan pre-selected. For minors you'll choose which parent/guardian should receive it; for couples and families you'll choose which members sign — each selected person gets their own copy to sign.
- Review the notification email and send. The plan appears in the client portal under Documents, marked optional.
- The client (or guardian) reviews a frozen copy of the plan, checks an attestation ("I have reviewed this treatment plan, participated in its development, and agree with its goals…"), and types their name to sign.
- You're emailed when they sign, the plan shows a Client signed badge, and their signature line appears alongside yours ("Signed by … (client)").
A few things worth knowing:
- Signing is always voluntary for the client — it's presented that way, and it's never a required checklist item. An unsigned request just waits; nothing depends on it.
- The copy is frozen at the moment you share it. Later edits to the plan never change what the client signed — their signed copy remains available verbatim in their portal Documents.
- Unlocking a plan cancels any un-signed requests automatically, so a client can't sign an outdated copy. After re-signing the revised plan, request a new client signature if you want one.
- Client signatures aren't required by most payers — but they're the cleanest evidence of the client's participation in treatment planning, which some Medicaid programs do require you to document.
Tips
- You can save a diagnosis without creating a treatment plan, or create a treatment plan without a diagnosis — both workflows are supported.
- Signing a diagnosis records your attestation (who signed, and when) on the entry — see Diagnoses for what signing does and doesn't change.
- The downloaded diagnosis summary is a plain text file named with the current date (e.g.,
diagnosis-summary-2026-03-22.txt). - Treatment plans are stored as FHIR CarePlan resources, making them interoperable with other healthcare systems.