Intake forms
Digital intake lets clients complete paperwork through the client portal before their first session — questionnaires, consent forms, baseline measures, demographics, even a card on file. This guide covers preparing your packet, sending it, tracking it, and where everything lands when it comes back.
Intake emails carry portal links, so your practice's portal URL must be configured first — if it isn't yet, the New Patient form and the intake wizard both point you to the setting and hold off sending until it's done.
Preparing your intake packet
Set up what your practice sends at Settings → Shareable Documents:
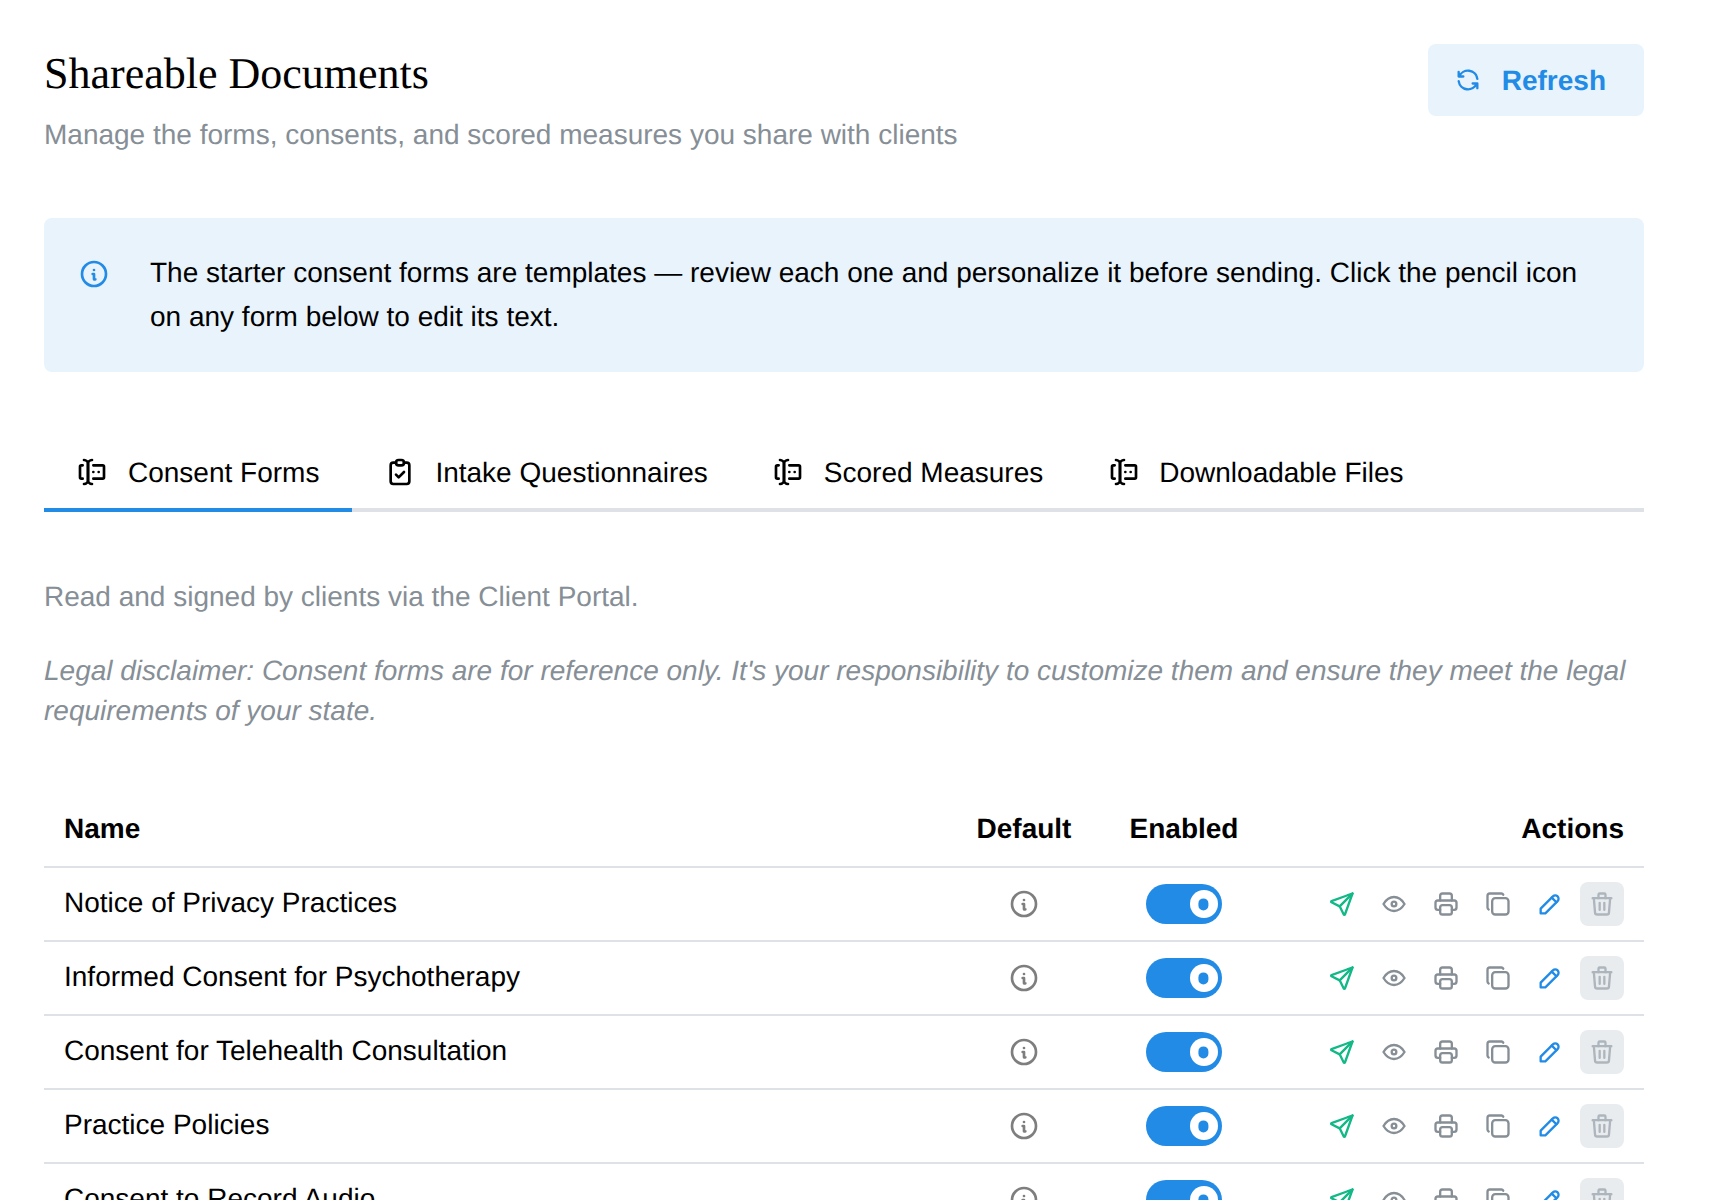
- Consent Forms — read and signed by clients in the portal. The standard set ships built in (system forms can't be deleted); add your own with New consent form.
- Intake Questionnaires — the forms clients fill out before a first session. Add custom ones with New intake questionnaire. This tab also holds the Demographics form card — a system form that writes answers straight to the client's chart; Edit lets you choose which fields appear and which are required (legal name and email always are).
- Scored Measures — the measure library (PHQ-9, GAD-7, and more). Measures you enable here become sendable in intakes; see Scored measures.
The Enabled switch on each row is what "in the packet" means: enabled documents come pre-checked every time you send an intake, so a well-tended Documents page makes sending a two-click affair.
Each consent form and intake questionnaire row also has three handy actions:
- Printer button — opens a clean paper version of the form: your practice name at the top, checkboxes and ruled answer lines for each question, and (on consent forms) a written signature and date block. Print it or save it as a PDF for clients who prefer paper, or to review a form's exact wording.
- Duplicate — creates a copy named "(Copy)" that starts switched off until you review it. The copy is a custom form you can rename and edit freely — the quickest way to make a variant of an existing questionnaire or consent without starting from scratch.
- Delete — removes a custom form you no longer need. Deletion is blocked for any form a client has ever been sent (their completed paperwork must stay readable), and system forms can't be deleted — switch them off instead.
Building a custom intake questionnaire
- Settings → Shareable Documents → Intake Questionnaires → New intake questionnaire. (Or Duplicate an existing questionnaire and edit the copy.)
- Give it a title, then use Add question for each question and Add section to put related questions under a heading.
- Click a question to edit it. The type dropdown on the right sets what the client sees:
| Type | What the client sees | Use it for |
|---|---|---|
| Instructions (no answer) | Text only — no answer box | Explaining a section, a heading, a paragraph of guidance |
| Yes / No | A Yes / No choice | "Have you been in therapy before?" |
| Short answer | A single-line text box | Names, a medication, anything a few words long |
| Paragraph | A multi-line text box | "Tell us what brings you in" — anything a sentence or longer |
| Multiple choice (pick one) | Pick one from a list you define | Marital status, referral source, preferred contact method |
| Checkboxes (pick several) | Tick any that apply from your list | "Select all that apply" symptom lists, who may be contacted |
| Multiple choice with Other | Pick one from your list, or type their own | "How did you hear about us?" with a fill-in "Other" |
| Date | A date picker | Date of birth, date of last physical |
| Number (whole) | A whole number | Number of children, years married |
| Number (decimal) | A number that allows decimals | Height, weight |
| File upload | A file chooser | Insurance card photo, prior records |
For the three list types, add the answer options underneath the question after you pick the type. Tick Required on anything the client must answer before they can submit.
A few more types sit behind Show advanced question types (date and time, time, number with unit, web address, record link). Most practices never need them.
A good default intake is mostly Paragraph (for open-ended history), Yes / No (for screening items), Multiple choice or Checkboxes (for anything with a fixed set of answers), and Instructions (to explain each section). Save, then switch the row's Enabled toggle on so it lands in the packet.
Want the client to sign the questionnaire? Tick Ask for client signature when submitting in the builder. After answering, the client types their full name to e-sign — recorded with the date and time, plus an optional "relationship to client" line for a parent or guardian completing forms on a client's behalf. The signature appears on the completed response.
Answers come back as a completed form on the client's Files tab; custom questionnaires don't write into chart fields (only the Demographics form does that).
Sending intake to a client
Four ways in, same wizard: check Start intake workflow when creating the client; use ⋮ → Start Intake Workflow on the Clients page; use New → Send Intake on the client's profile; or click Send Intake on the empty Portal Documents card. (Accepting a new client request also lands you in this wizard on the new client's chart — nothing is assigned until you choose.)
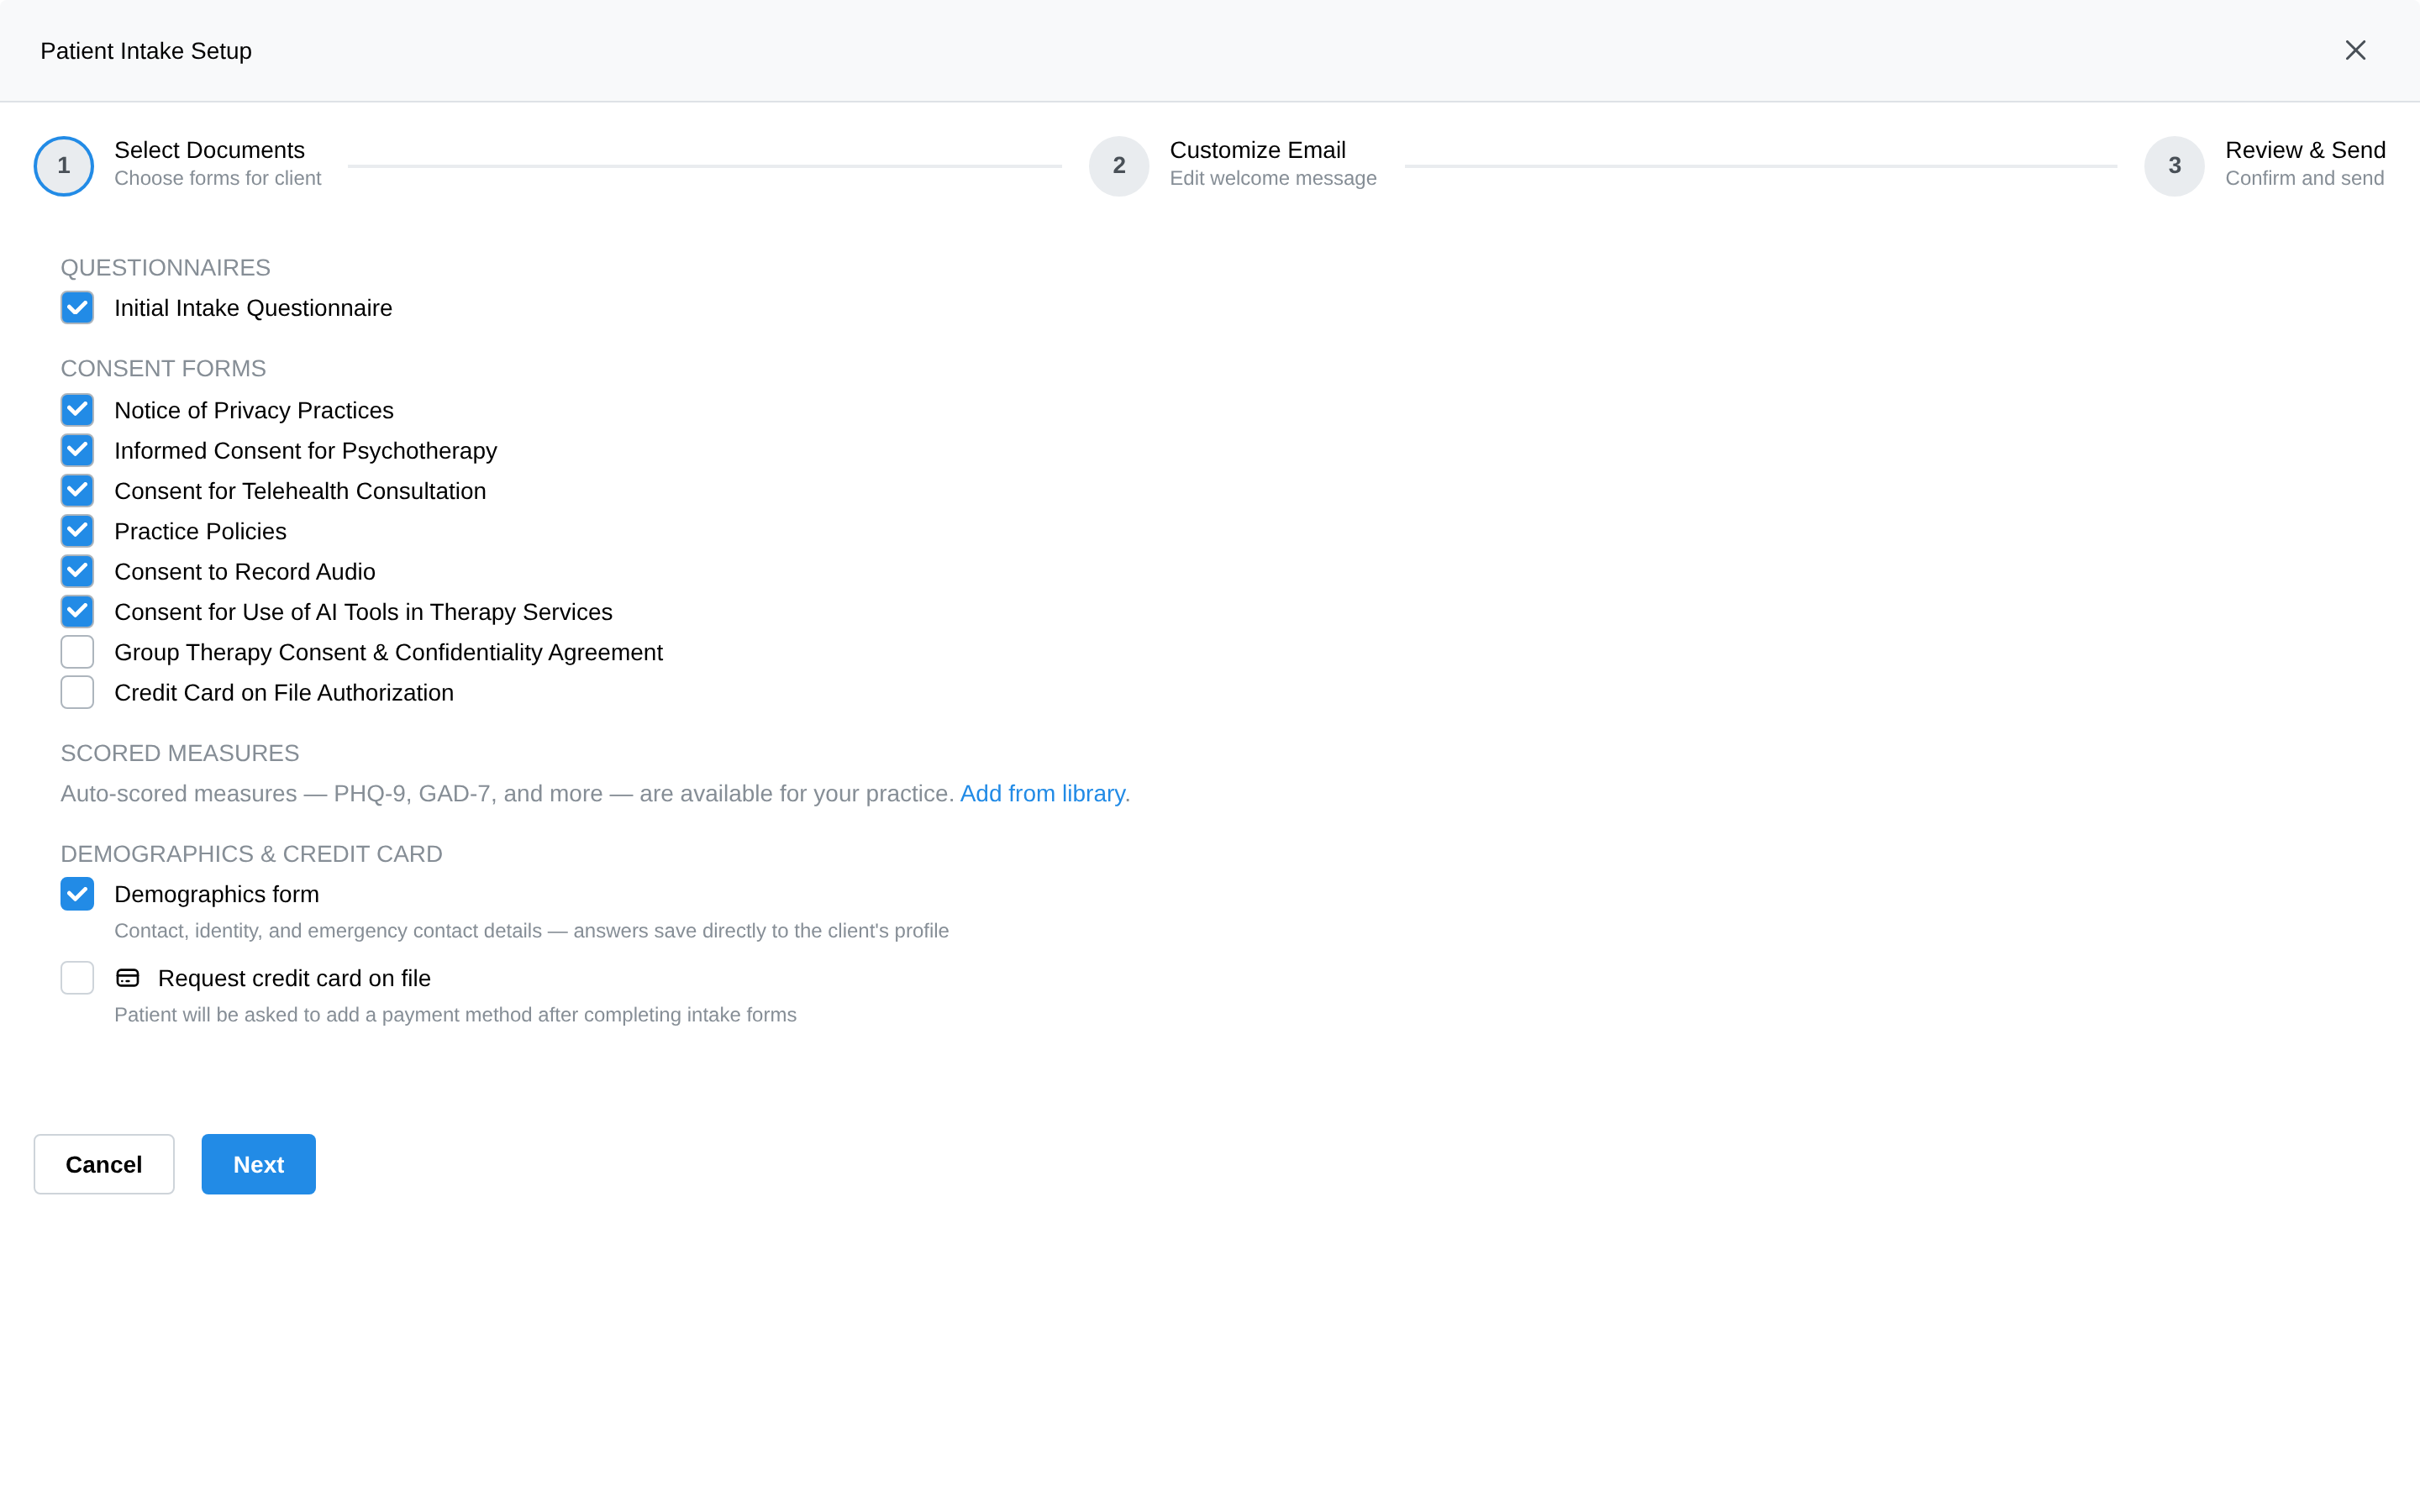
- Select Documents — your enabled packet comes pre-checked, in four sections: Questionnaires, Consent Forms, Scored Measures (each measure with a frequency — once, or recurring on a schedule), and Demographics & Credit Card (the demographics form plus "Request credit card on file", which asks the client to add a payment method after their forms). Preview any document with the eye icon.
- Customize Email — the welcome email, with placeholders for client, clinician, and practice details filled per send. Save template as default keeps your wording for next time.
- Review & Send — a summary, plus the Client Portal Account card: the wizard detects whether the client already has portal access and adjusts — "This client already has portal access — they'll get a sign-in link, not a new account." Click Send Intake.
The client gets one email; everything you assigned waits in their portal.
Minors, couples, and families
The same flow adapts to who actually does the paperwork:
- Minors — the wizard starts by asking who receives what: every guardian with an email is included by default (that's deliberate — guardians sign consents for children), the minor themselves only if they have their own email. Each recipient then gets their own document selection and their own email.
- Couples & families — one step per member, each with their own document selection; a minor member's paperwork routes to their guardian's email. See Couples & family therapy.
Sharing more documents later
New → Share Documents on the profile is the same wizard in share mode — for the mid-treatment consent update or a one-off form. Differences from intake: nothing is pre-checked, already-sent pending items are locked so you can't double-send, and no portal account is created unless you switch it on.
Sharing with many clients at once: the Share Documents button at the top of the client list runs the same wizard for a whole selection of clients — the way to send an updated consent, a policy change, or an assessment to everyone affected in one pass. It's a one-time send to the clients you pick (it doesn't create a recurring assignment), and each client's copy tracks separately on their own chart.
Tracking intake status
-
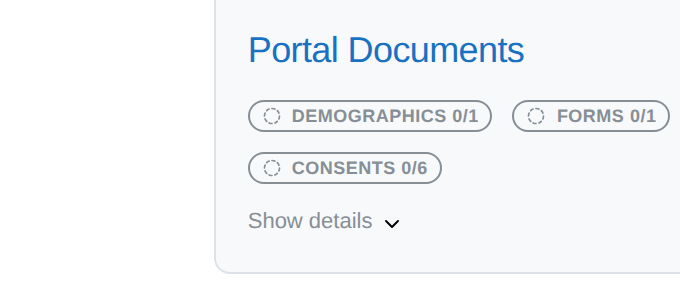
The client profile's Portal Documents card shows progress per category (Forms, Consents, Assessments) with a completed/total count — expand Show details for item-by-item status, and look for "All documents completed."
-
The client's Files tab badges anything still pending; the row menu's Send reminder emails the client about their unfinished items (automatic pre-appointment nudges are the Incomplete document reminders switch — see Reminders).
-
You get an email when a client finishes the last of their assigned intake forms — no need to poll the chart.
-
If the card warns that some forms "could not be assigned when it was sent," re-send the intake to retry — already-completed items stay completed.
Where the finished paperwork lands
- Every completed form appears on the client's Files tab — click through to read the responses.
- Demographics answers write back automatically to the client's chart: profile fields, an emergency contact, and insurance details if provided. Only answered fields are written — blanks never erase what's already there.
- Scored measures are scored on submission and charted on the Measures tab.
- Consent forms carry an electronic signature record — signer name plus the date and time, captured when the client signs in the portal. The exact text of the form as it read at signing is frozen onto the record, so editing a consent template later never changes what a past signature says.
FAQ
Can I duplicate an intake questionnaire or consent form? Yes — use the Duplicate button on the form's row at Settings → Shareable Documents. The copy starts disabled until you review it.
Can I control the order clients see their forms? No — assigned items appear together in the portal. If sequence matters clinically, send in two batches.
Can I take back a form I sent? Delete its pending row on the Files tab; for a recurring measure, use End recurrence. There's no un-send for something already completed.
Is the prescreener part of intake? No — the prescreener screens prospective clients on the public booking page, before they exist as clients. Intake forms go to clients you've already created.
The client says they never got the email. Check their spam folder first, then re-run Send Intake (or Resend Invitation on the Portal tab if it's the portal account email they're missing).